Synchronisation des agendas
Synchronisation der Kalender
Calendar Synchronization
Calendar Synchronization
Sincronizzazione dei calendari
Sincronização de agendas
Sincronización de calendarios
Agence Plus : export de l’agenda vers un iPhone
Agence Plus: Export des Kalenders auf ein iPhone
Agence Plus: Exporting the calendar to an iPhone
Agence Plus: Exporting the calendar to an iPhone
Agence Plus: esportare il calendario su un iPhone
Agence Plus: exportação da agenda para um iPhone
Agence Plus: exportación de la agenda a un iPhone
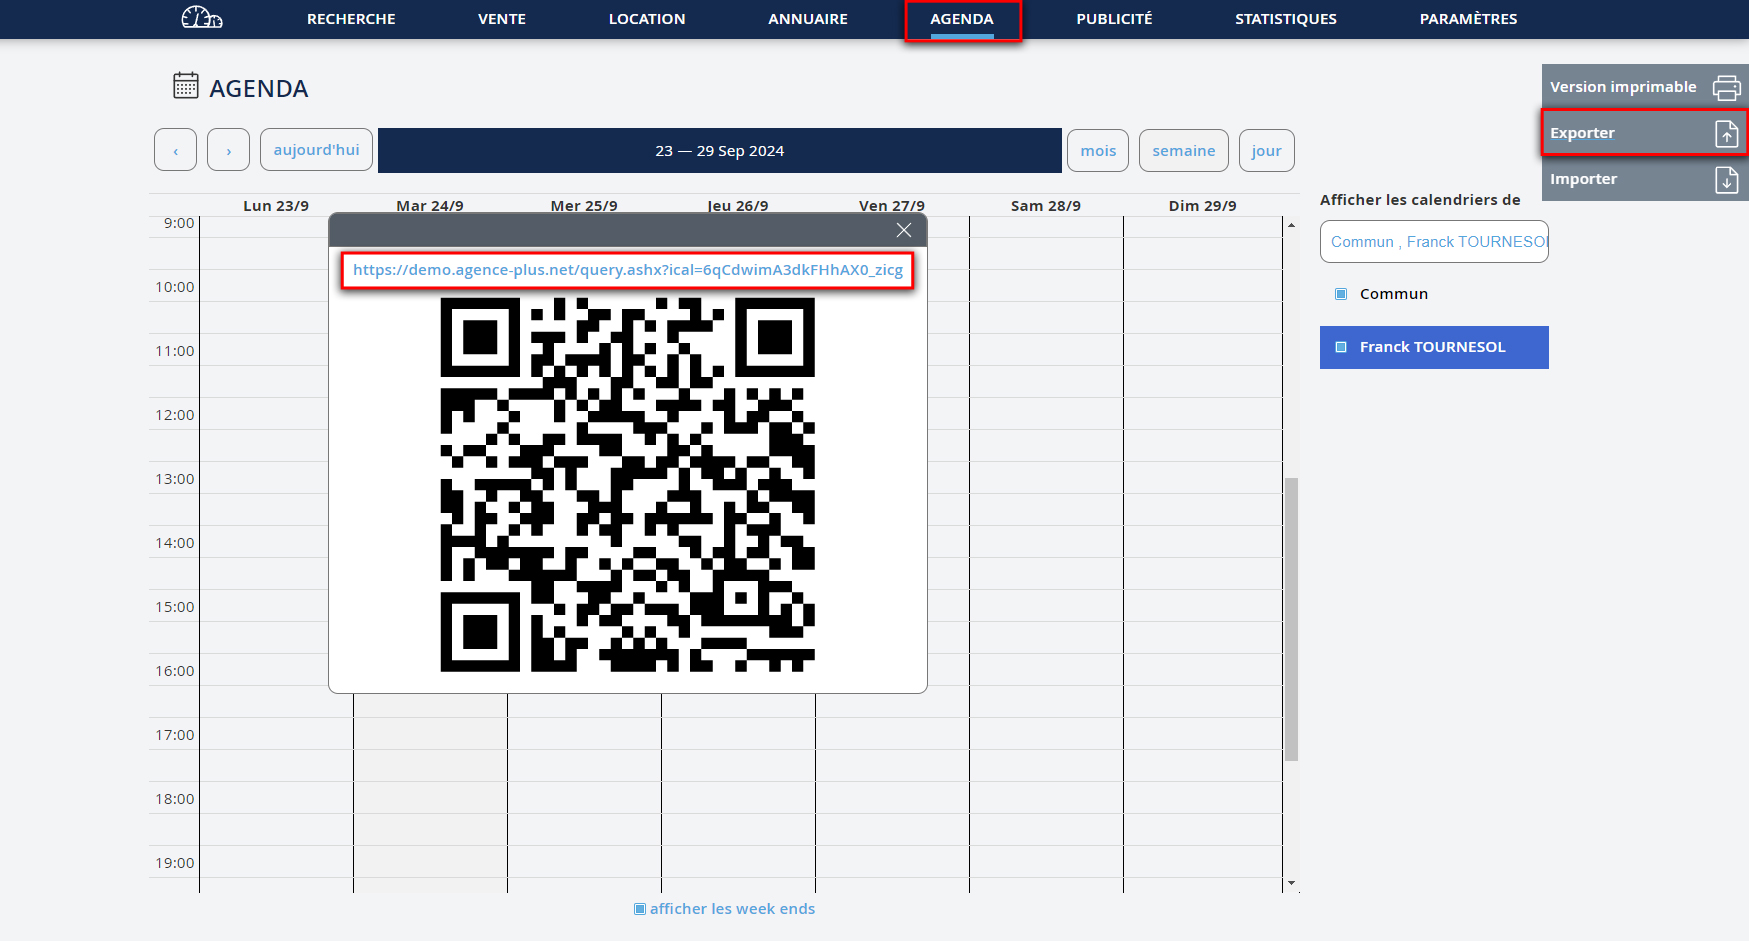
- Allez sur la page "Agenda" du logiciel Agence Plus
- puis cliquez sur "Exporter".
- Copiez le lien qui apparaît dans un e-mail que vous envoyez à une adresse accessible depuis votre iPhone.
- Gehen Sie zur Seite "Agenda" der Agence Plus-Software
- Klicken Sie dann auf "Exportieren".
- Kopieren Sie den Link, der in einer E-Mail erscheint, die Sie an eine Adresse senden, die von Ihrem iPhone aus zugänglich ist.
- Go to the "Agenda" page of the Agence Plus software
- Then click on "Export".
- Copy the link that appears in an email you send to an address accessible from your iPhone.
- Go to the "Agenda" page of the Agence Plus software
- Then click on "Export".
- Copy the link that appears in an email you send to an address accessible from your iPhone.
- Vai alla pagina "Agenda" del software Agence Plus
- Poi fai clic su "Esporta".
- Copia il link che appare in un'e-mail che invii a un indirizzo accessibile dal tuo iPhone.
- Vá para a página "Agenda" do software Agence Plus
- Depois clique em "Exportar".
- Copie o link que aparece em um e-mail que você envia para um endereço acessível a partir do seu iPhone.
- Vaya a la página "Agenda" del software Agence Plus
- Luego haga clic en "Exportar".
- Copie el enlace que aparece en un correo electrónico que envíe a una dirección accesible desde su iPhone.


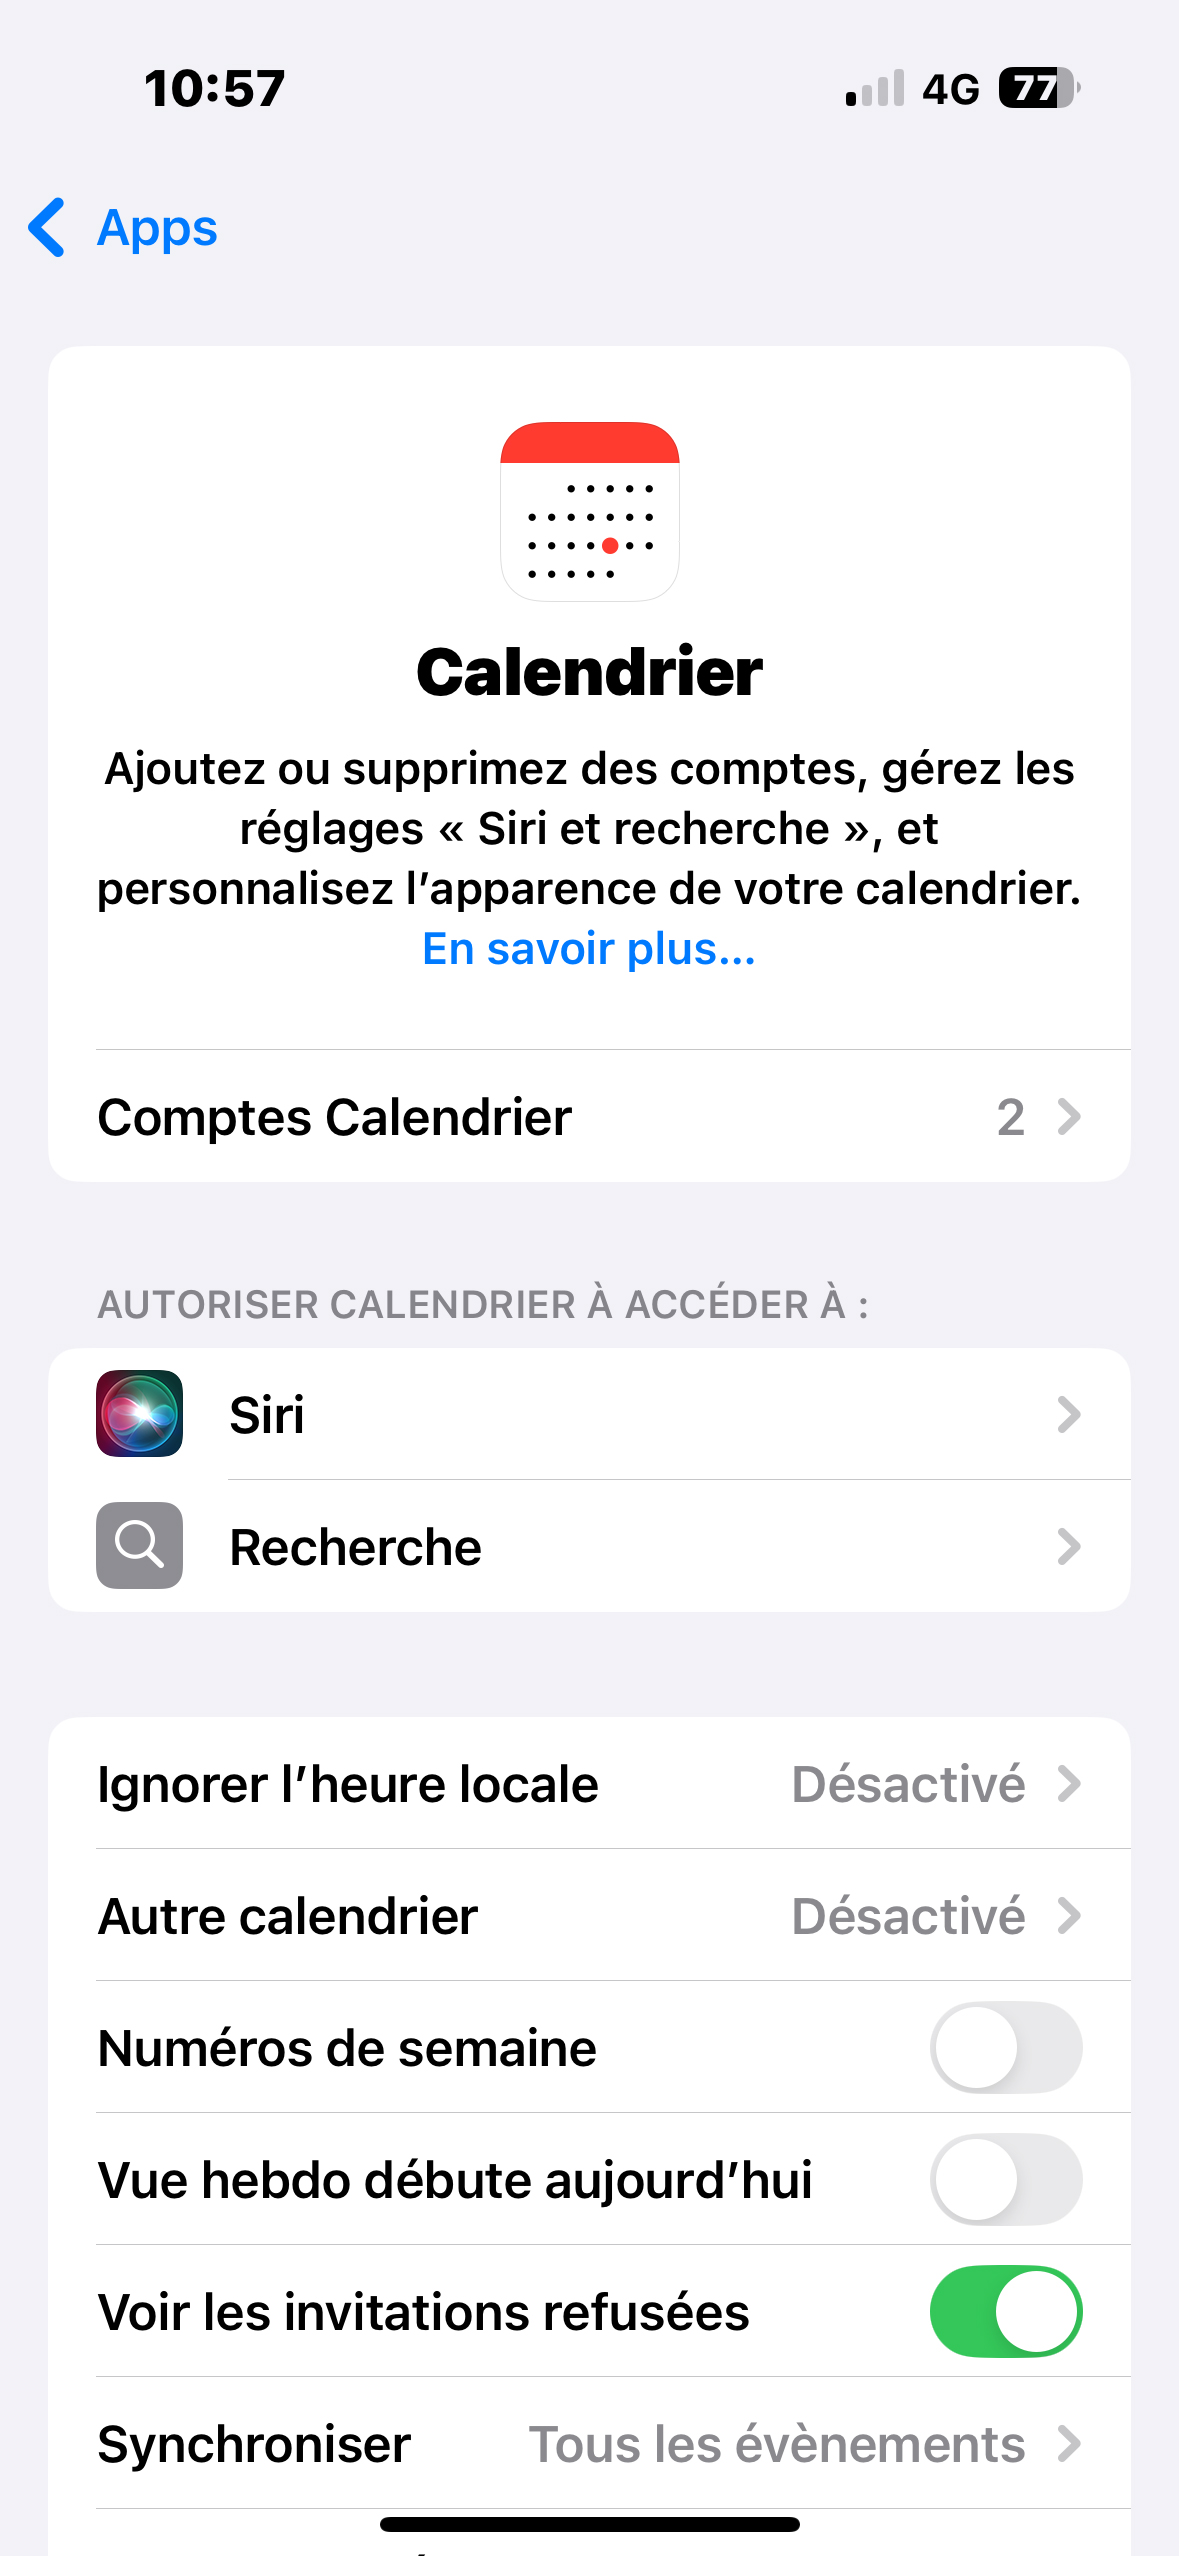
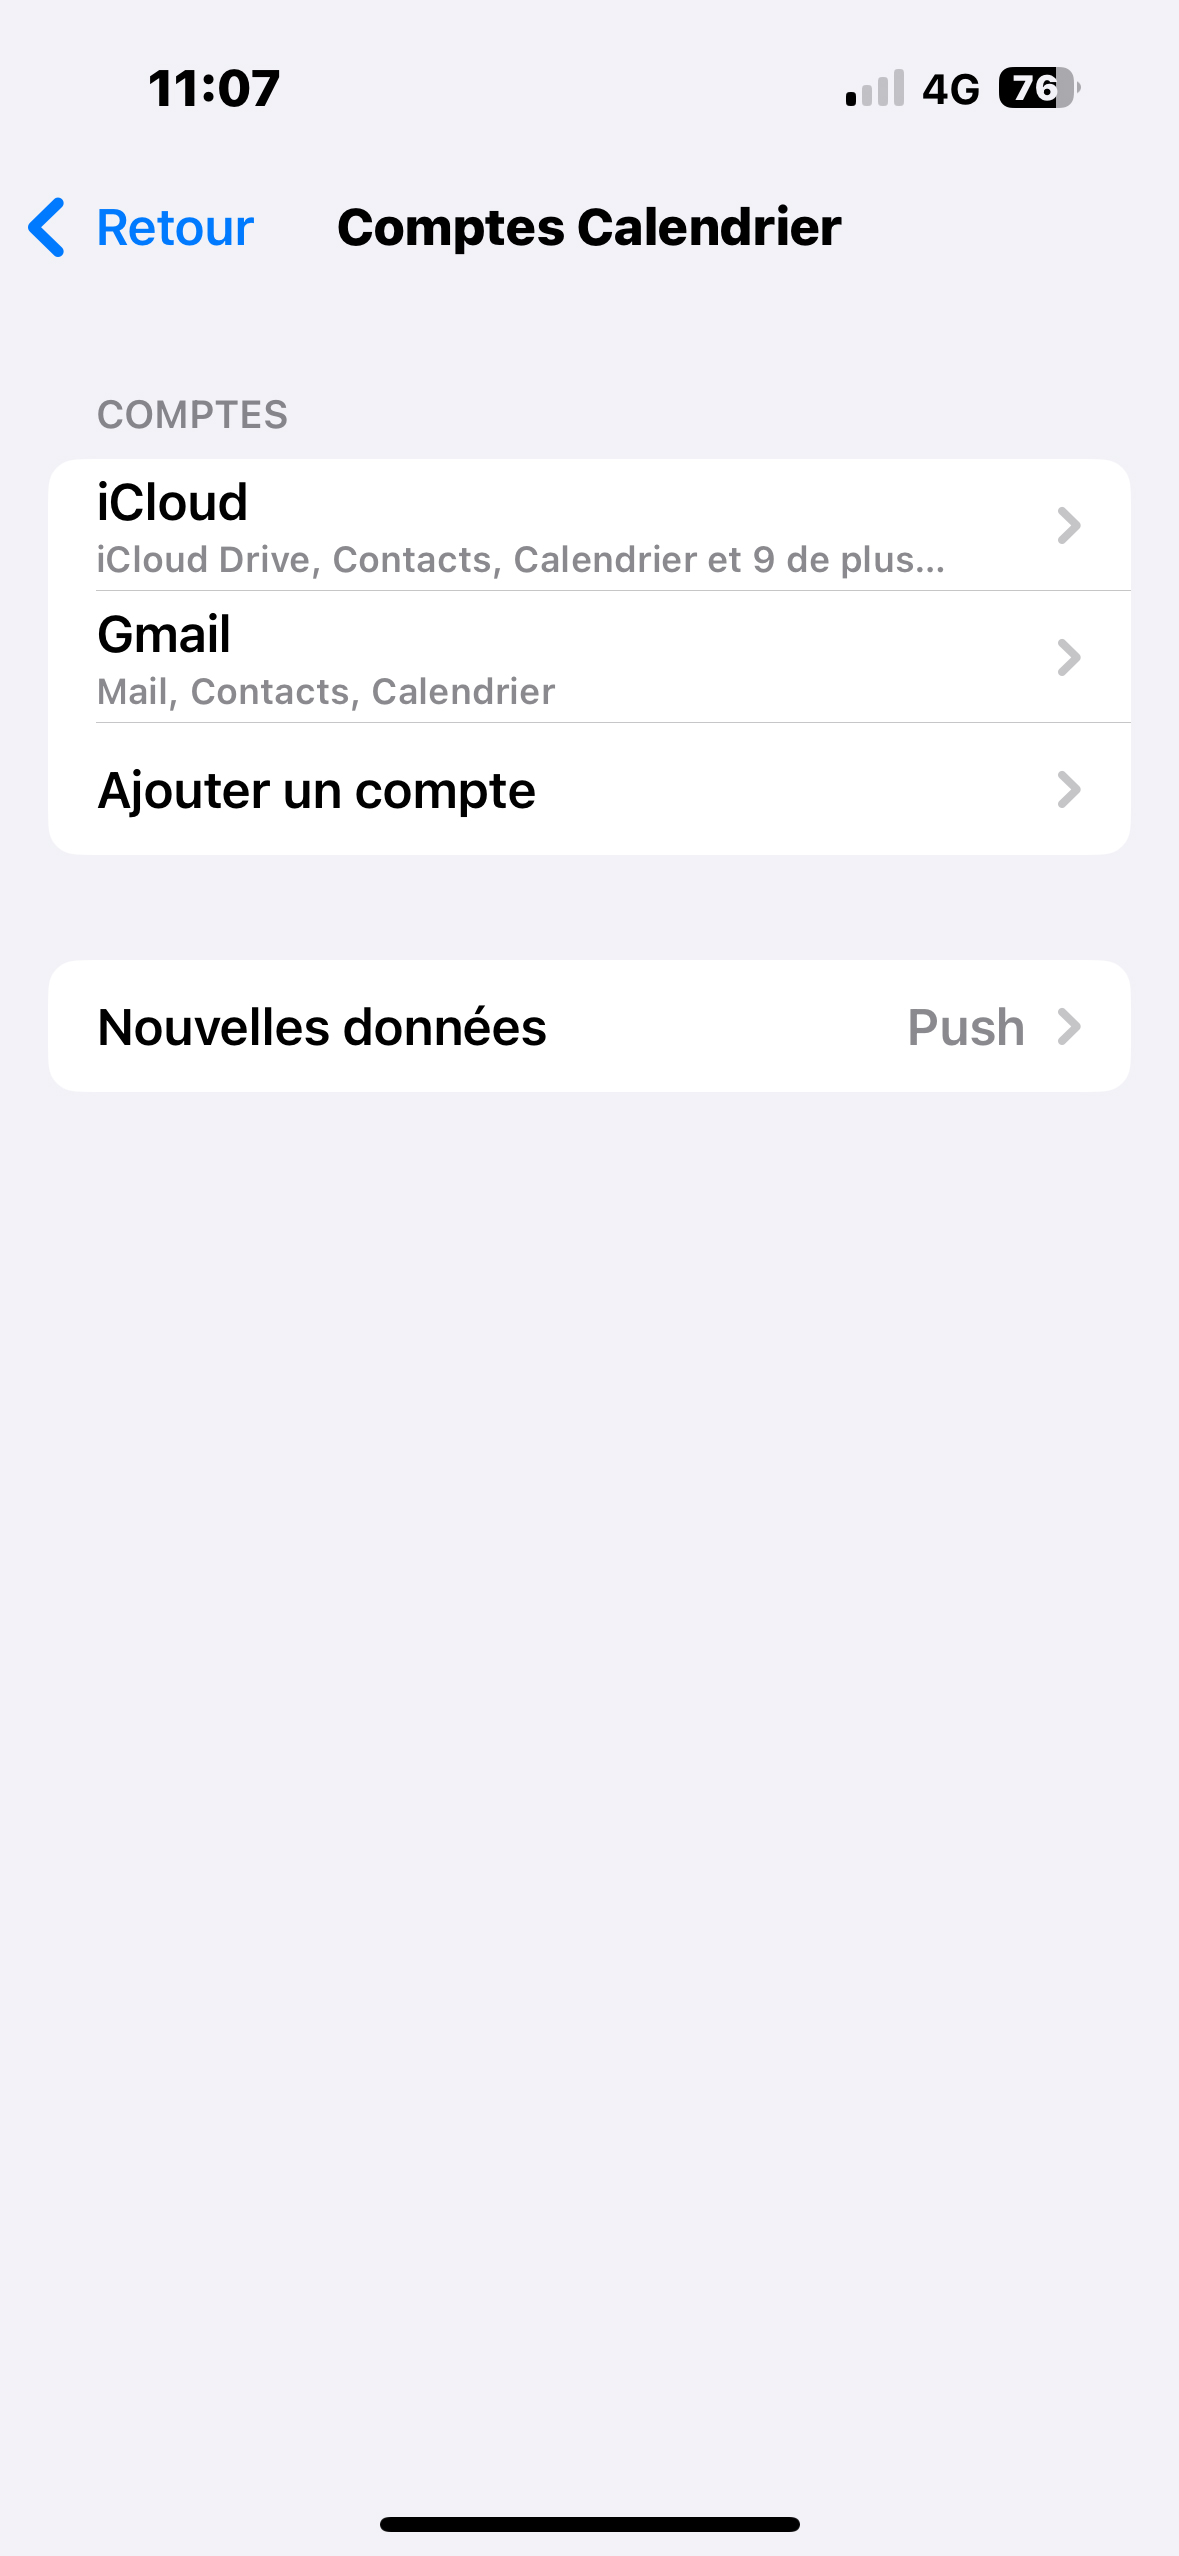
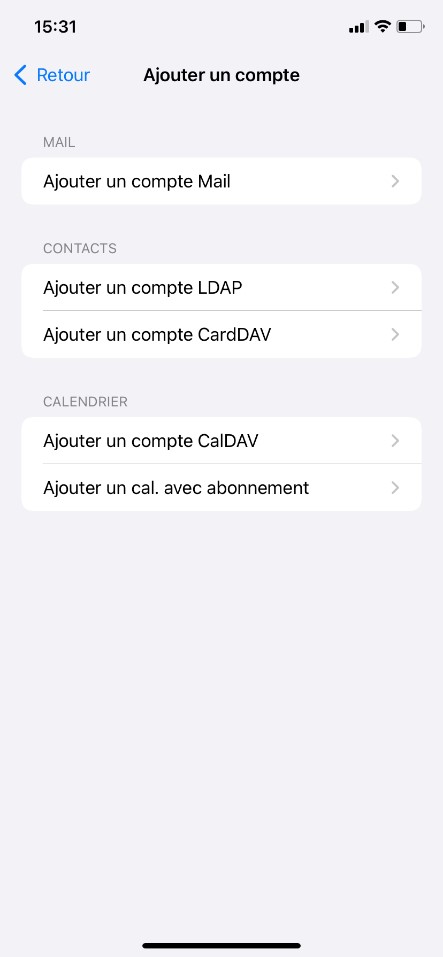
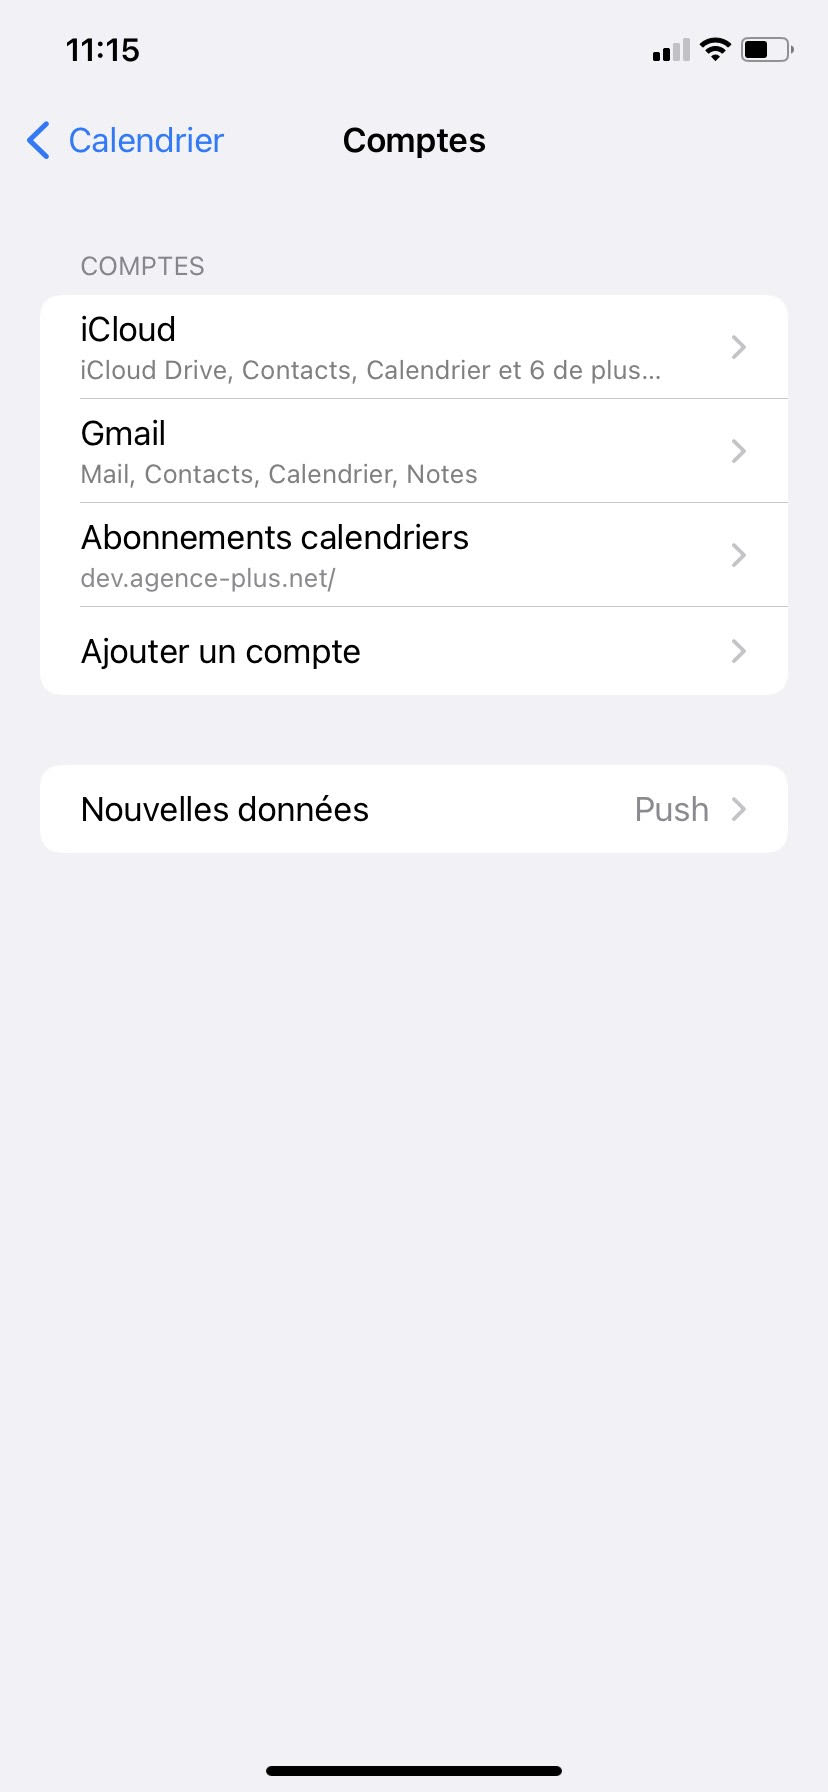
- Sur votre iPhone, allez dans les "Réglages"
- puis cliquez sur "Apps" > "Calendrier" > "Comptes Calendrier" > "Ajouter un compte" > "Autre"
- Gehen Sie auf Ihrem iPhone zu "Einstellungen"
- Klicken Sie dann auf "Apps" > "Kalender" > "Kalenderkonten" > "Ein Konto hinzufügen" > "Andere"
- On your iPhone, go to "Settings"
- Then click on "Apps" > "Calendar" > "Calendar Accounts" > "Add Account" > "Other"
- On your iPhone, go to "Settings"
- Then click on "Apps" > "Calendar" > "Calendar Accounts" > "Add Account" > "Other"
- Sul tuo iPhone, vai su "Impostazioni"
- Poi fai clic su "App" > "Calendario" > "Account Calendario" > "Aggiungi account" > "Altro"
- No seu iPhone, vá para "Definições"
- Depois clique em "Aplicações" > "Calendário" > "Contas de Calendário" > "Adicionar Conta" > "Outro"
- En su iPhone, vaya a "Ajustes"
- Luego haga clic en "Aplicaciones" > "Calendario" > "Cuentas de Calendario" > "Agregar cuenta" > "Otro"


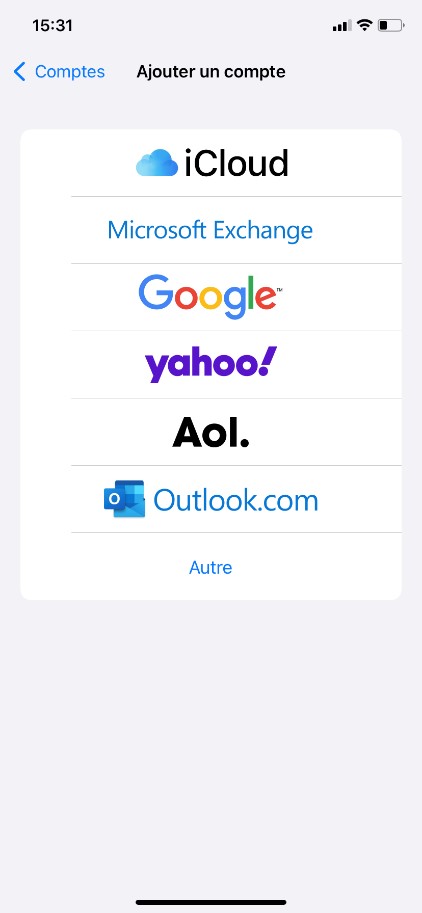


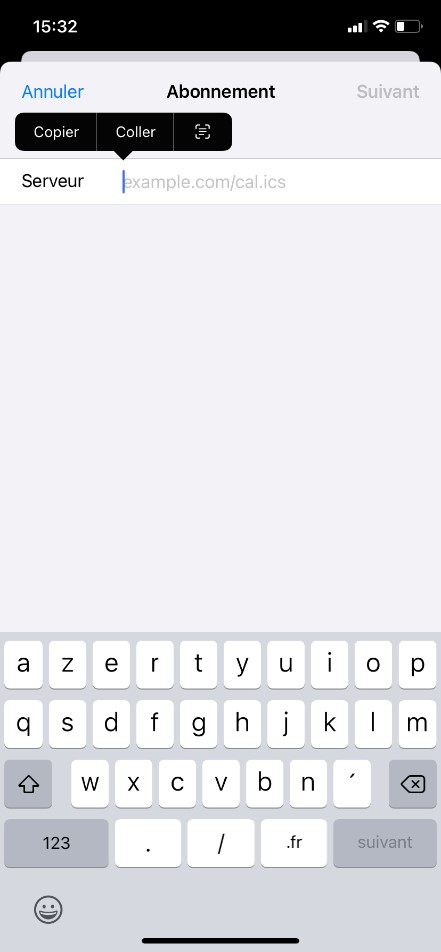
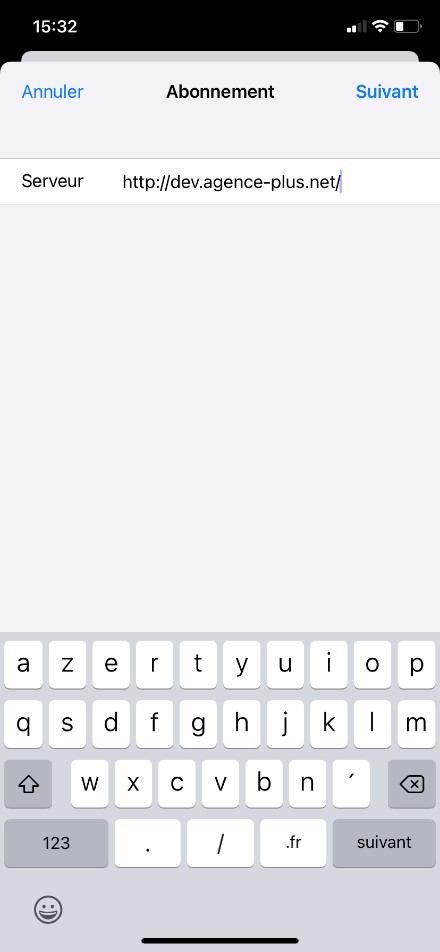
- Cliquez sur "Ajouter un cal. avec abonnement"
- Puis dans Serveur, copiez le lien apparaissant dans le mail.
- Klicken Sie auf "Kalender mit Abo hinzufügen"
- Dann im Server, kopieren Sie den Link, der in der E-Mail erscheint.
- Click on "Add calendar with subscription"
- Then in Server, copy the link appearing in the email.
- Click on "Add calendar with subscription"
- Then in Server, copy the link appearing in the email.
- Clicca su "Aggiungi calendario con abbonamento"
- Poi in Server, copia il link che appare nell'email.
- Clique em "Adicionar calendário com subscrição"
- Depois em Servidor, copie o link que aparece no email.
- Haga clic en "Agregar calendario con suscripción"
- Luego en Servidor, copie el enlace que aparece en el correo electrónico.


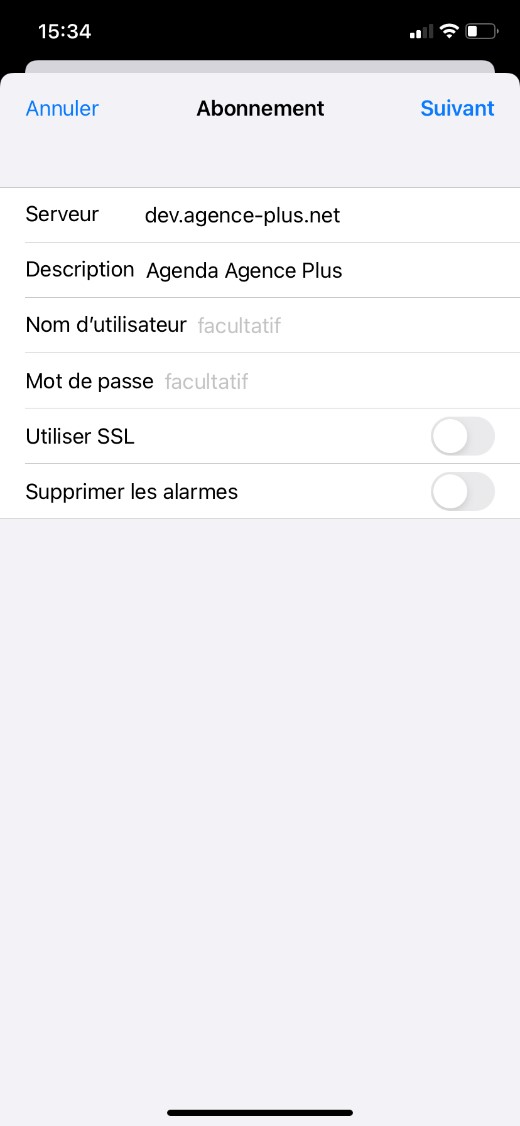
- Vous pouvez ensuite changer, si besoin, la description associée à cet agenda
- Et cliquer sur "Suivant".
Celui-ci apparaît maintenant dans la liste des agendas de votre iPhone.
- Danach können Sie, falls nötig, die Beschreibung dieses Kalenders ändern
- Und auf "Weiter" klicken.
Dieser erscheint jetzt in der Kalenderliste auf Ihrem iPhone.
- You can then change, if necessary, the description associated with this calendar
- And click on "Next".
It will now appear in the list of calendars on your iPhone.
- You can then change, if necessary, the description associated with this calendar
- And click on "Next".
It will now appear in the list of calendars on your iPhone.
- Puoi quindi cambiare, se necessario, la descrizione associata a questo calendario
- E cliccare su "Avanti".
Ora apparirà nella lista dei calendari del tuo iPhone.
- Você pode então mudar, se necessário, a descrição associada a este calendário
- E clicar em "Seguinte".
Agora ele aparecerá na lista de agendas do seu iPhone.
- Luego puede cambiar, si es necesario, la descripción asociada a este calendario
- Y hacer clic en "Siguiente".
Ahora aparecerá en la lista de calendarios de su iPhone.


Agence Plus : export de l’agenda vers un smartphone Android
Agence Plus: Export des Kalenders auf ein Android-Smartphone
Agence Plus: Exporting the calendar to an Android smartphone
Agence Plus: Exporting the calendar to an Android smartphone
Agence Plus: esportazione del calendario su uno smartphone Android
Agence Plus: exportação da agenda para um smartphone Android
Agence Plus: exportación de la agenda a un smartphone Android
Solution 1 (avec Google Agenda)
- Allez sur la page "Agenda" du logiciel Agence Plus
- puis cliquez sur "Exporter".
- Copiez le lien qui apparaît (clic droit sur le lien puis cliquez sur "copier l'adresse du lien" ou copier le raccourci selon le navigateur utilisé)
Lösung 1 (mit Google Kalender)
- Gehen Sie zur Seite "Agenda" der Agence Plus-Software
- Klicken Sie dann auf "Exportieren".
- Kopieren Sie den Link, der erscheint (Rechtsklick auf den Link und klicken Sie auf "Link-Adresse kopieren" oder Verknüpfung kopieren je nach verwendetem Browser)
Solution 1 (with Google Calendar)
- Go to the "Agenda" page of the Agence Plus software
- Then click on "Export".
- Copy the link that appears (right-click on the link and click "copy link address" or copy shortcut depending on the browser used)
Solution 1 (with Google Calendar)
- Go to the "Agenda" page of the Agence Plus software
- Then click on "Export".
- Copy the link that appears (right-click on the link and click "copy link address" or copy shortcut depending on the browser used)
Soluzione 1 (con Google Calendar)
- Vai alla pagina "Agenda" del software Agence Plus
- Poi fai clic su "Esporta".
- Copia il link che appare (clicca con il tasto destro sul link e seleziona "copia l'indirizzo del link" o copia il collegamento a seconda del browser utilizzato)
Solução 1 (com Google Agenda)
- Vá para a página "Agenda" do software Agence Plus
- Depois clique em "Exportar".
- Copie o link que aparece (clique direito sobre o link e clique em "copiar endereço do link" ou copiar atalho dependendo do navegador utilizado)
Solución 1 (con Google Calendar)
- Vaya a la página "Agenda" del software Agence Plus
- Luego haga clic en "Exportar".
- Copie el enlace que aparece (haga clic derecho sobre el enlace y haga clic en "copiar la dirección del enlace" o copiar el acceso directo según el navegador utilizado)


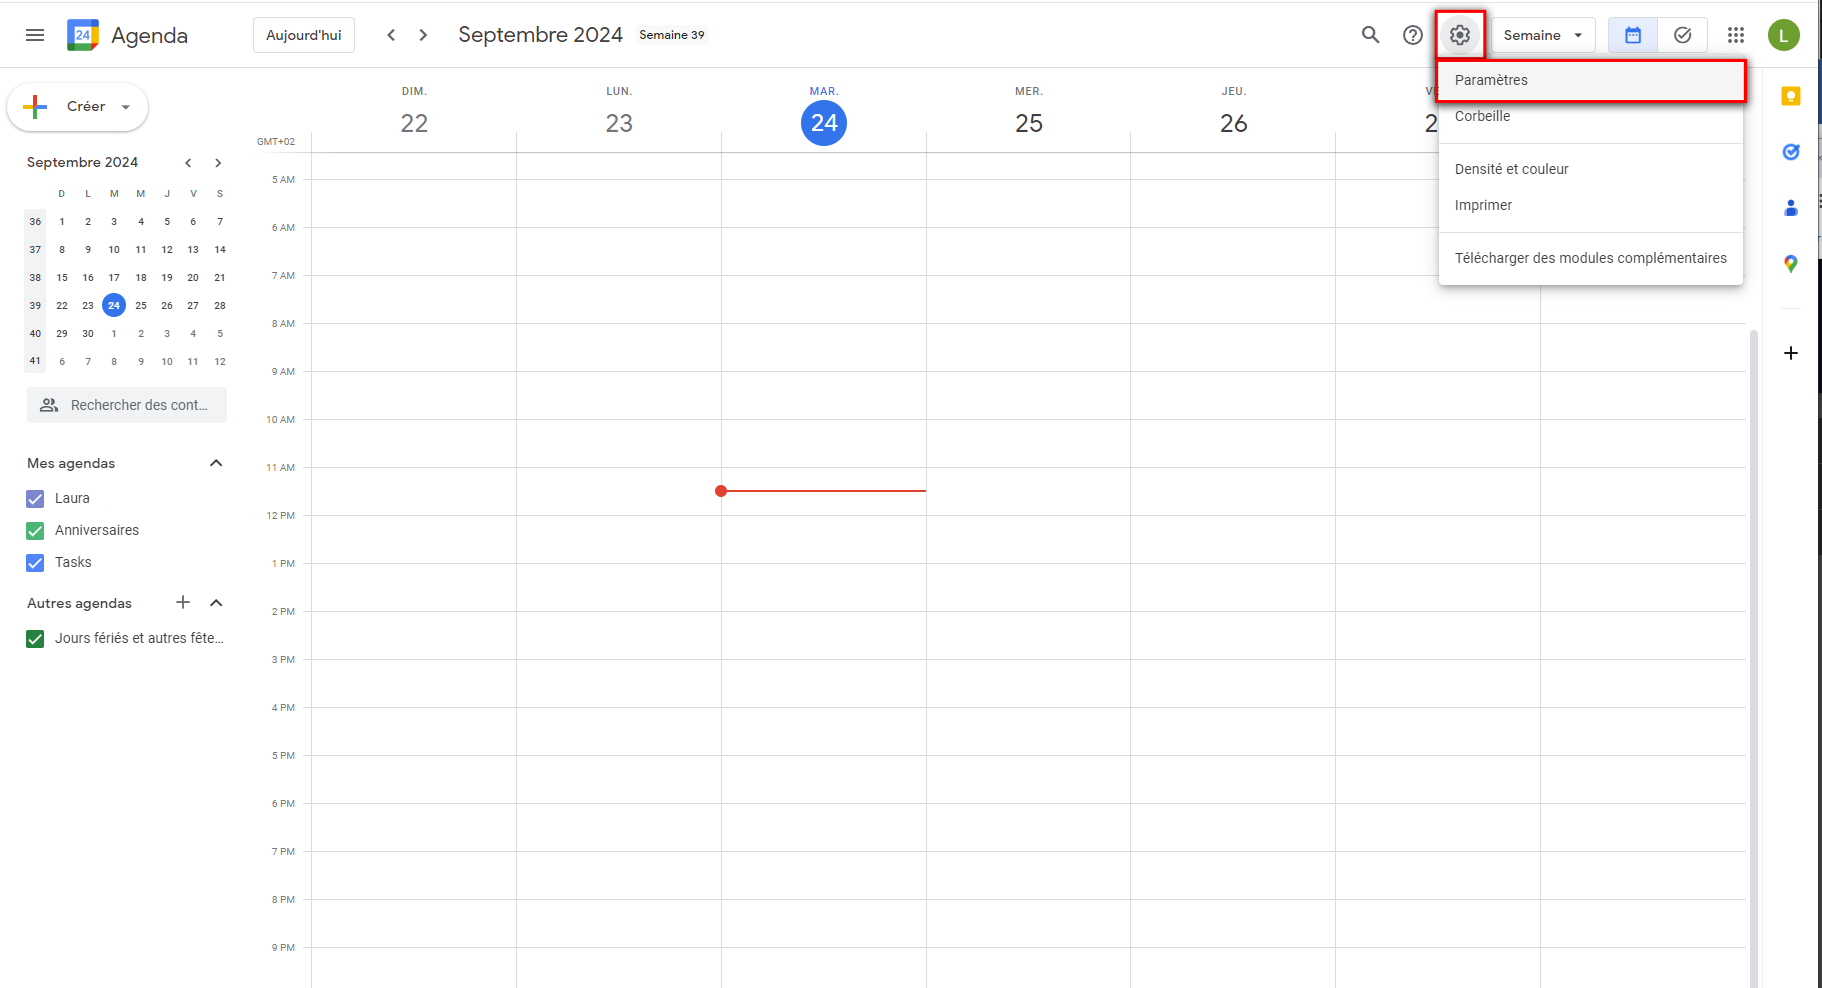
- Ensuite, ouvrez votre agenda Google et cliquez sur "Paramètres"
- Öffnen Sie dann Ihren Google Kalender und klicken Sie auf "Einstellungen"
- Then open your Google Calendar and click on "Settings"
- Then open your Google Calendar and click on "Settings"
- Successivamente, apri il tuo Google Calendar e fai clic su "Impostazioni"
- Em seguida, abra o seu Google Agenda e clique em "Definições"
- Luego, abra su Google Calendar y haga clic en "Ajustes"


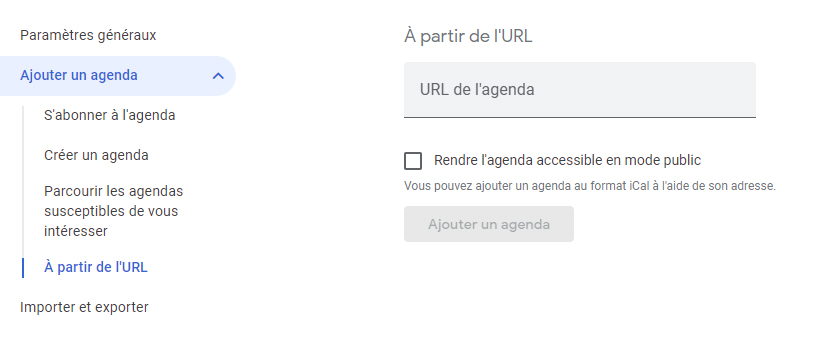
- Cliquez sur "Ajouter un agenda", puis sur "A partir de l'URL"
- Klicken Sie auf "Kalender hinzufügen", dann auf "Von URL"
- Click on "Add calendar", then on "From URL"
- Click on "Add calendar", then on "From URL"
- Fai clic su "Aggiungi calendario", poi su "Da URL"
- Clique em "Adicionar agenda", depois em "De URL"
- Haga clic en "Agregar calendario", luego en "Desde URL"


- Collez le lien que vous avez récupéré depuis l'agenda d'Agence Plus dans le champs URL
- puis cliquez sur le bouton "Ajouter un agenda".
- Fügen Sie den Link ein, den Sie aus dem Agence Plus Kalender erhalten haben, in das Feld URL
- Klicken Sie dann auf die Schaltfläche "Kalender hinzufügen".
- Paste the link you retrieved from the Agence Plus calendar into the URL field
- Then click on the "Add calendar" button.
- Paste the link you retrieved from the Agence Plus calendar into the URL field
- Then click on the "Add calendar" button.
- Incolla il link che hai ottenuto dal calendario di Agence Plus nel campo URL
- Poi fai clic sul pulsante "Aggiungi calendario".
- Cole o link que obteve do calendário Agence Plus no campo URL
- Depois clique no botão "Adicionar agenda".
- Pegue el enlace que obtuvo desde el calendario de Agence Plus en el campo URL
- Luego haga clic en el botón "Agregar calendario".


L'agenda d'Agence Plus sera désormais consultable sur l’agenda Google et depuis les mobiles Android associés à ce compte Google.
Der Agence Plus Kalender ist nun im Google Kalender und auf den mit diesem Google-Konto verknüpften Android-Mobilgeräten verfügbar.
The Agence Plus calendar will now be available in Google Calendar and on Android mobiles associated with this Google account.
The Agence Plus calendar will now be available in Google Calendar and on Android mobiles associated with this Google account.
Il calendario di Agence Plus sarà ora disponibile su Google Calendar e su dispositivi mobili Android associati a questo account Google.
O calendário Agence Plus estará agora disponível no Google Calendar e nos dispositivos Android associados a esta conta do Google.
El calendario de Agence Plus estará ahora disponible en Google Calendar y en los dispositivos Android asociados a esta cuenta de Google.
Solution 2 (application du store)
Une autre manière d'avoir ses rendez-vous dans le calendrier de son téléphone Android est de passer par une application tierce, installée de préférence depuis le Play
Store (nous déclinons toute responsabilité sur la confidentialité ou les dommages pouvant être causés par l'utilisation d'une application tierce comme celle proposée ici).
- Allez sur la page "Agenda" du logiciel Agence Plus
- Cliquez sur "Exporter".
- Copiez le lien qui apparaît (clic droit sur le lien)
- Cliquez sur "copier l'adresse du lien" ou copier le raccourci selon le navigateur utilisé)
- Puis envoyez-vous ce lien pour que vous puissiez le retrouver sur votre téléphone, par email par exemple vers une adresse email que vous pouvez consulter depuis votre téléphone.
Lösung 2 (Store-App)
Eine weitere Möglichkeit, Ihre Termine im Kalender Ihres Android-Handys zu haben, ist die Verwendung einer Drittanbieter-App, die vorzugsweise aus dem Play Store installiert wird (wir übernehmen keine Verantwortung für die Privatsphäre oder Schäden, die durch die Verwendung einer Drittanbieter-App wie der hier vorgeschlagenen entstehen könnten).
- Gehen Sie zur Seite "Agenda" der Agence Plus-Software
- Klicken Sie auf "Exportieren".
- Kopieren Sie den Link, der erscheint (Rechtsklick auf den Link)
- Klicken Sie auf "Link-Adresse kopieren" oder Verknüpfung kopieren je nach verwendetem Browser)
- Senden Sie sich dann diesen Link, damit Sie ihn auf Ihrem Telefon finden können, z. B. per E-Mail an eine Adresse, die Sie auf Ihrem Telefon abrufen können.
Solution 2 (store application)
Another way to get your appointments in your Android phone calendar is by using a third-party app, preferably installed from the Play Store (we take no responsibility for privacy or damages that may occur due to the use of third-party apps like the one proposed here).
- Go to the "Agenda" page of the Agence Plus software
- Click on "Export".
- Copy the link that appears (right-click on the link)
- Click on "copy link address" or copy shortcut depending on the browser used)
- Then send yourself the link so that you can find it on your phone, for example via email to an address that you can access from your phone.
Soluzione 2 (app dallo store)
Un altro modo per avere i tuoi appuntamenti nel calendario del tuo telefono Android è utilizzare un'app di terze parti, preferibilmente installata dal Play Store (non ci assumiamo alcuna responsabilità per la privacy o danni che potrebbero derivare dall'uso di un'app di terze parti come quella proposta qui).
- Vai alla pagina "Agenda" del software Agence Plus
- Fai clic su "Esporta".
- Copia il link che appare (clicca con il tasto destro sul link)
- Fai clic su "copia indirizzo del link" o copia collegamento a seconda del browser utilizzato)
- Poi inviati questo link per poterlo trovare sul tuo telefono, ad esempio tramite e-mail a un indirizzo che puoi consultare dal tuo telefono.
Solução 2 (aplicação da loja)
Outra forma de ter os seus compromissos no calendário do seu telemóvel Android é através de uma aplicação de terceiros, preferencialmente instalada a partir do Play Store (não nos responsabilizamos pela privacidade ou danos que possam ser causados pela utilização de uma aplicação de terceiros como a proposta aqui).
- Vá à página "Agenda" do software Agence Plus
- Clique em "Exportar".
- Copie o link que aparece (clique com o botão direito sobre o link)
- Clique em "copiar endereço do link" ou copiar atalho dependendo do navegador utilizado)
- Depois envie este link para si para poder encontrá-lo no seu telemóvel, por exemplo, por e-mail para um endereço que possa consultar no seu telemóvel.
Solución 2 (aplicación de la tienda)
Otra forma de tener tus citas en el calendario de tu teléfono Android es utilizando una aplicación de terceros, preferentemente instalada desde el Play Store (no nos responsabilizamos por la privacidad o daños que puedan ocurrir debido al uso de aplicaciones de terceros como la propuesta aquí).
- Vaya a la página "Agenda" del software Agence Plus
- Haga clic en "Exportar".
- Copie el enlace que aparece (haga clic derecho sobre el enlace)
- Haga clic en "copiar la dirección del enlace" o copiar acceso directo dependiendo del navegador utilizado)
- Luego envíese este enlace para que pueda encontrarlo en su teléfono, por ejemplo, por correo electrónico a una dirección que pueda consultar desde su teléfono.


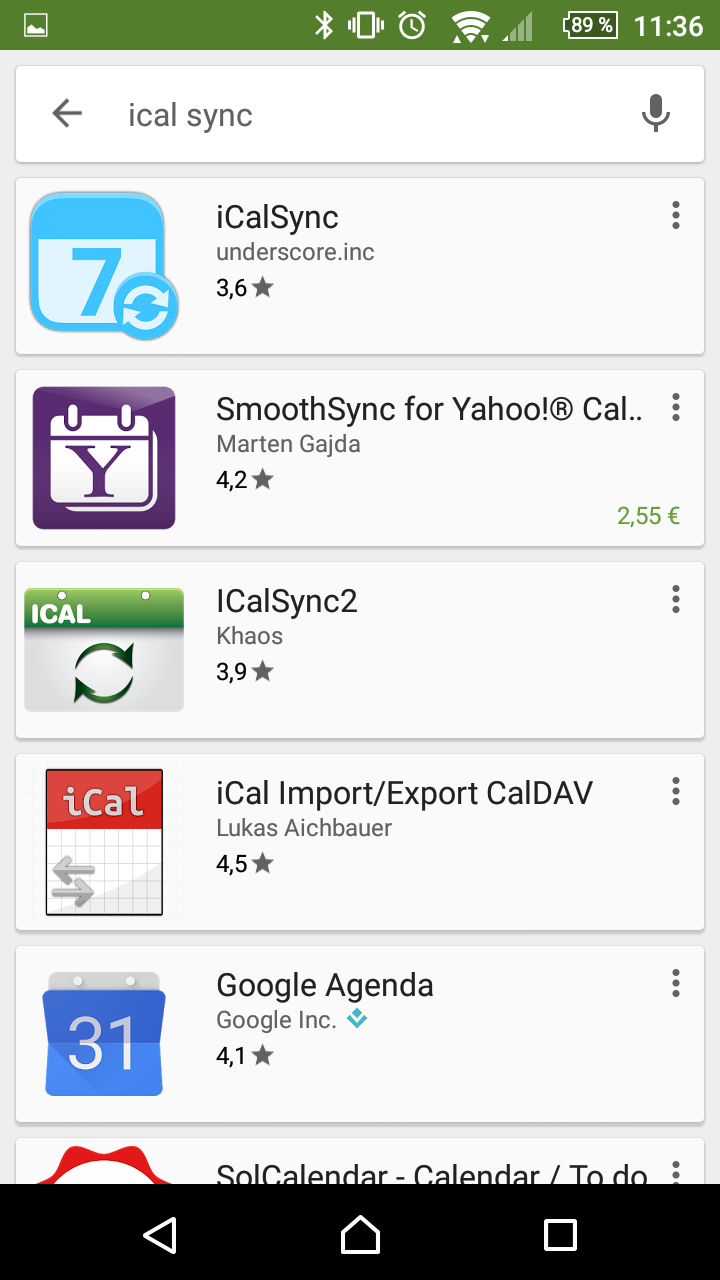
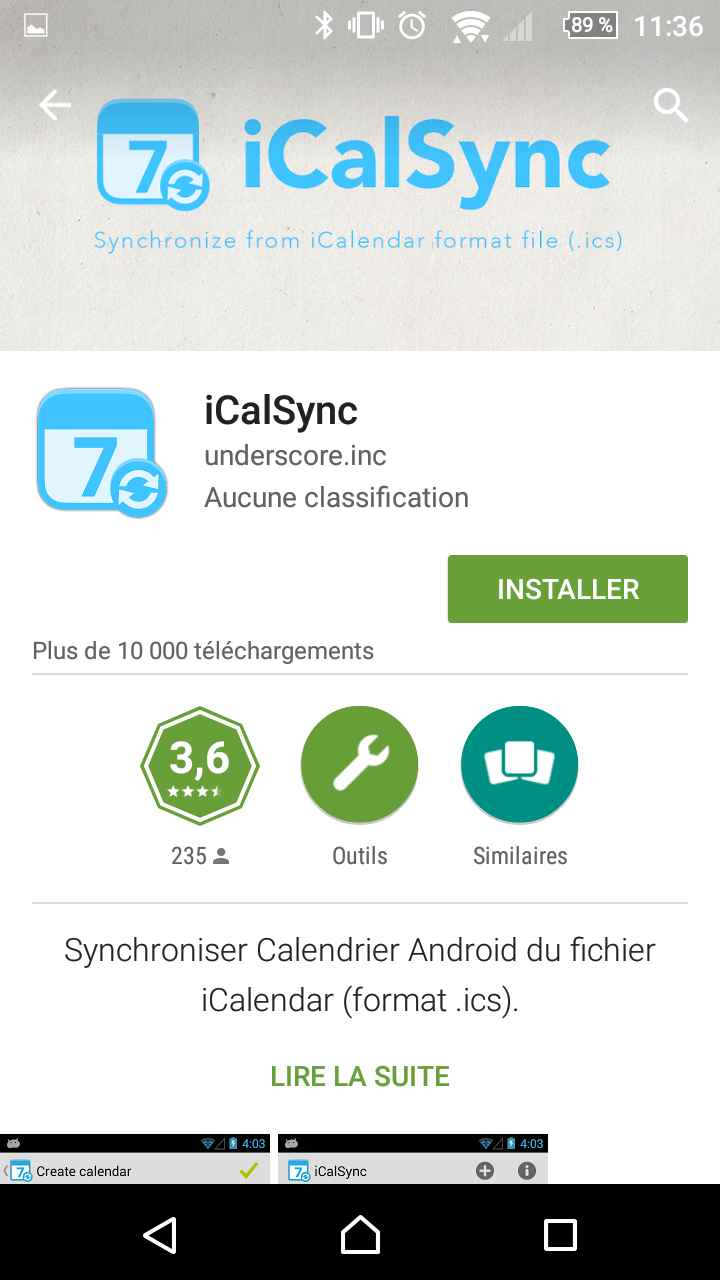
- Ensuite depuis votre téléphone, ouvrez l'application Play Store
- Puis recherchez ical sync
- Cliquez sur "iCalSync" de underscore.inc
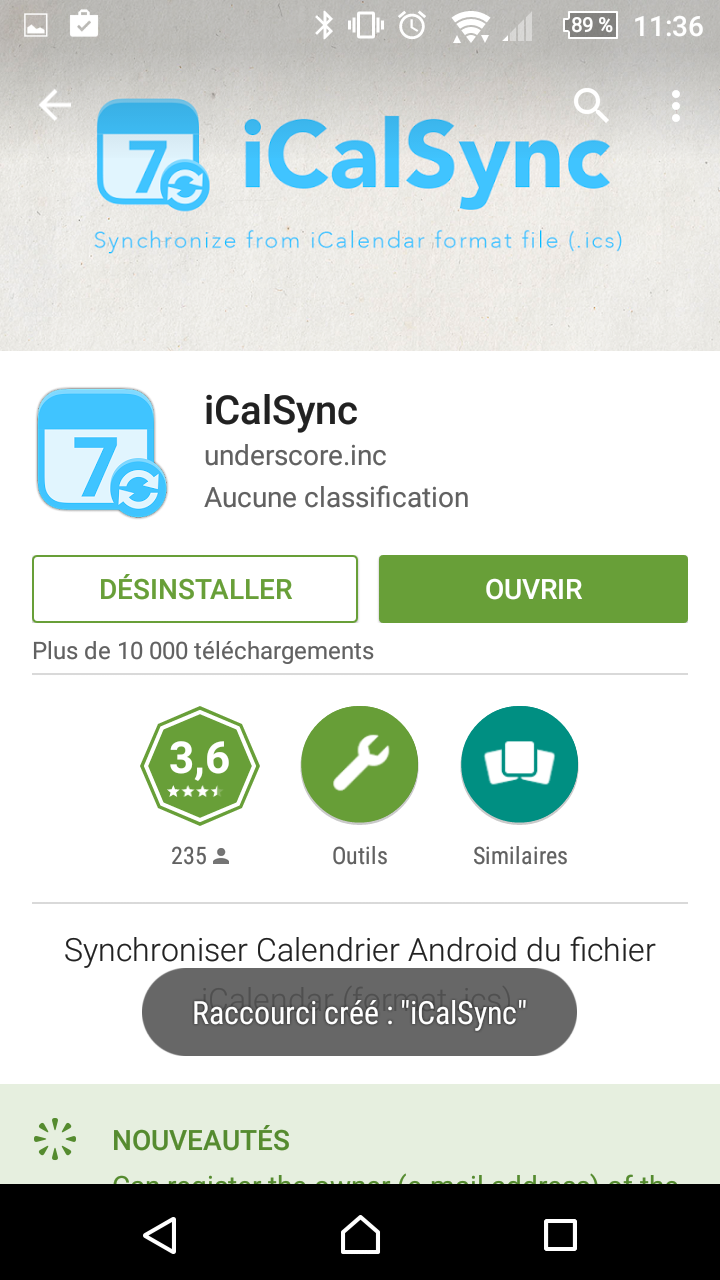
- Cliquez sur "Installer"
- Puis sur "Ouvrir"
- Öffnen Sie dann auf Ihrem Telefon die Play Store-App
- Suchen Sie nach ical sync
- Klicken Sie auf "iCalSync" von underscore.inc
- Klicken Sie auf "Installieren"
- Klicken Sie dann auf "Öffnen"
- Then, from your phone, open the Play Store app
- Search for ical sync
- Click on "iCalSync" by underscore.inc
- Click on "Install"
- Then click on "Open"
- Then, from your phone, open the Play Store app
- Search for ical sync
- Click on "iCalSync" by underscore.inc
- Click on "Install"
- Then click on "Open"
- Successivamente, dal tuo telefono, apri l'app Play Store
- Cerca ical sync
- Clicca su "iCalSync" di underscore.inc
- Clicca su "Installa"
- Poi clicca su "Apri"
- Em seguida, no seu telemóvel, abra a aplicação Play Store
- Procure por ical sync
- Clique em "iCalSync" de underscore.inc
- Clique em "Instalar"
- Depois clique em "Abrir"
- Luego, desde su teléfono, abra la aplicación Play Store
- Busque ical sync
- Haga clic en "iCalSync" de underscore.inc
- Haga clic en "Instalar"
- Luego haga clic en "Abrir"


L'application iCalSync s'ouvre :
- Cliquez sur le "+" en haut à droite pour créer un calendrier
Die iCalSync-App öffnet sich:
- Klicken Sie auf das "+" oben rechts, um einen Kalender zu erstellen
The iCalSync app opens:
- Click on the "+" in the top right to create a calendar
The iCalSync app opens:
- Click on the "+" in the top right to create a calendar
L'app iCalSync si apre:
- Fai clic sul "+" in alto a destra per creare un calendario
A aplicação iCalSync abre-se:
- Clique no "+" no canto superior direito para criar um calendário
La aplicación iCalSync se abre:
- Haga clic en el "+" en la parte superior derecha para crear un calendario


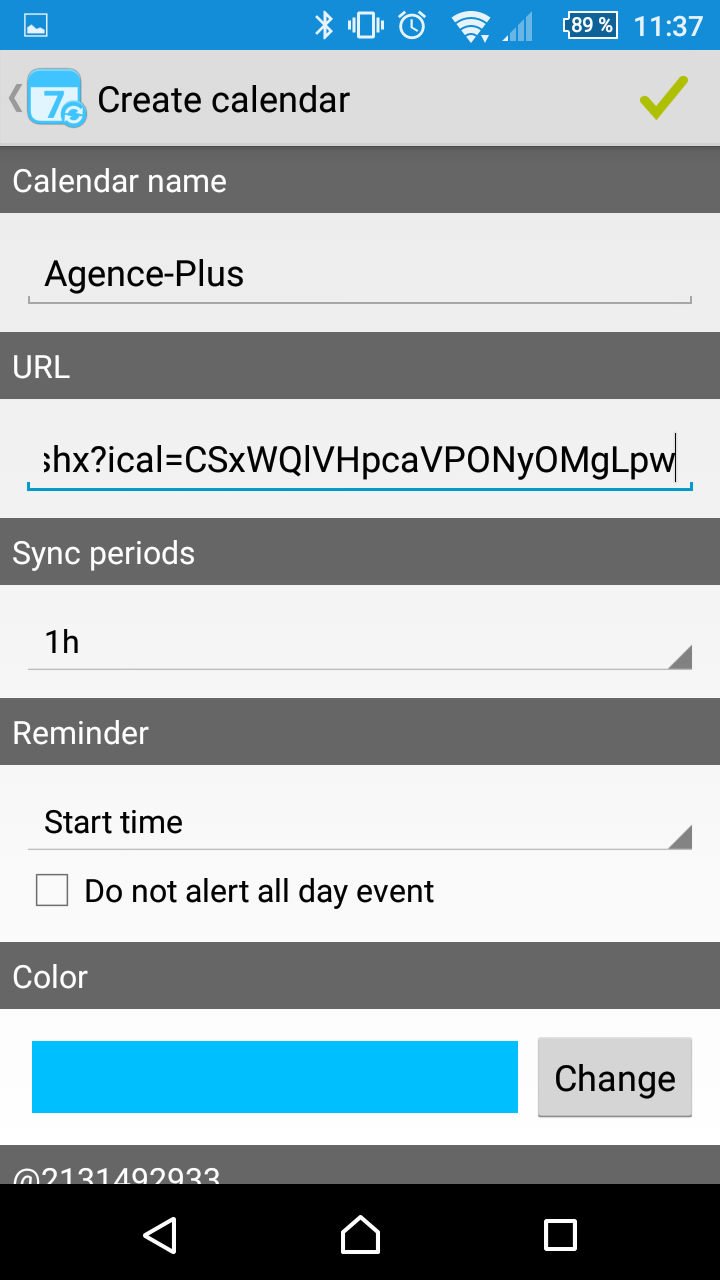


- Renseignez les champs Calendar name en mettant "Agence-Plus" par exemple (c'est le nom qui apparaîtra dans votre application calendrier Android)
- Collez l'URL du calendrier que vous avez obtenu depuis le bouton "Exporter"
dans le logiciel Agence Plus.
- Puis cliquez sur le bouton vert en haut à droite pour valider.
Le calendrier du logiciel Agence Plus s'intègre alors dans votre calendrier du téléphone. Pour visualiser les rendez-vous, ouvrez
simplement l'application Calendrier sur votre téléphone.
- Geben Sie die Felder Calendar name ein, indem Sie zum Beispiel "Agence-Plus" eingeben (dies ist der Name, der in Ihrer Android-Kalender-App angezeigt wird)
- Fügen Sie die URL des Kalenders ein, die Sie über die Schaltfläche "Exportieren" im Agence Plus-Software erhalten haben.
- Klicken Sie dann auf die grüne Schaltfläche oben rechts, um zu bestätigen.
Der Agence Plus-Kalender wird nun in Ihren Telefon-Kalender integriert. Um die Termine anzuzeigen, öffnen Sie einfach die Kalender-App auf Ihrem Telefon.
- Fill in the Calendar name field with something like "Agence-Plus" (this will be the name shown in your Android calendar app)
- Paste the URL of the calendar you got from the "Export" button in the Agence Plus software.
- Then click on the green button in the top right to confirm.
The Agence Plus calendar will then be integrated into your phone calendar. To view the appointments, simply open the Calendar app on your phone.
- Inserisci il campo Calendar name con qualcosa come "Agence-Plus" (questo sarà il nome che verrà mostrato nell'app calendario Android)
- Incolla l'URL del calendario che hai ottenuto dal pulsante "Esporta"
nel software Agence Plus.
- Poi fai clic sul pulsante verde in alto a destra per confermare.
Il calendario di Agence Plus verrà integrato nel tuo calendario del telefono. Per visualizzare gli appuntamenti, apri semplicemente l'app Calendario sul tuo telefono.
- Preencha o campo Calendar name com algo como "Agence-Plus" (este será o nome mostrado na sua aplicação de calendário Android)
- Cole a URL do calendário que obteve através do botão "Exportar"
no software Agence Plus.
- Em seguida, clique no botão verde no canto superior direito para confirmar.
O calendário do Agence Plus será então integrado no seu calendário do telefone. Para visualizar os compromissos, basta abrir a aplicação Calendário no seu telefone.
- Rellene el campo Calendar name con algo como "Agence-Plus" (este será el nombre que aparecerá en su aplicación de calendario de Android)
- Pegue la URL del calendario que obtuvo desde el botón "Exportar"
en el software Agence Plus.
- Luego haga clic en el botón verde en la parte superior derecha para confirmar.
El calendario de Agence Plus se integrará entonces en su calendario del teléfono. Para ver las citas, simplemente abra la aplicación Calendario en su teléfono.