Paramétrages
Einstellungen
Settings
Settings
Impostazioni
Configurações
Ajustes
Vous retrouverez dans cette rubrique toute l’aide dont vous avez besoin concernant la rubrique Paramètres de votre logiciel
In diesem Abschnitt finden Sie alle Hilfe, die Sie benötigen, um die Parameter Ihres Programms zu verwalten.
You will find in this section all the help you need regarding the Settings section of your software.
You will find in this section all the help you need regarding the Settings section of your software.
In questa sezione troverai tutta l'assistenza di cui hai bisogno per la sezione Impostazioni del tuo software.
Nesta seção, encontrará toda a ajuda de que necessita sobre a seção de Definições do seu software.
Encontrará en esta sección toda la ayuda que necesita sobre la sección de Configuración de su software.
Création d'un nouvel utilisateur et/ou modification des comptes existants
Erstellung eines neuen Benutzers und/oder Änderung bestehender Konten
Creation of a new user and/or modification of existing accounts
Creation of a new user and/or modification of existing accounts
Creazione di un nuovo utente e/o modifica degli account esistenti
Criação de um novo utilizador e/ou modificação de contas existentes
Creación de un nuevo usuario y/o modificación de cuentas existentes
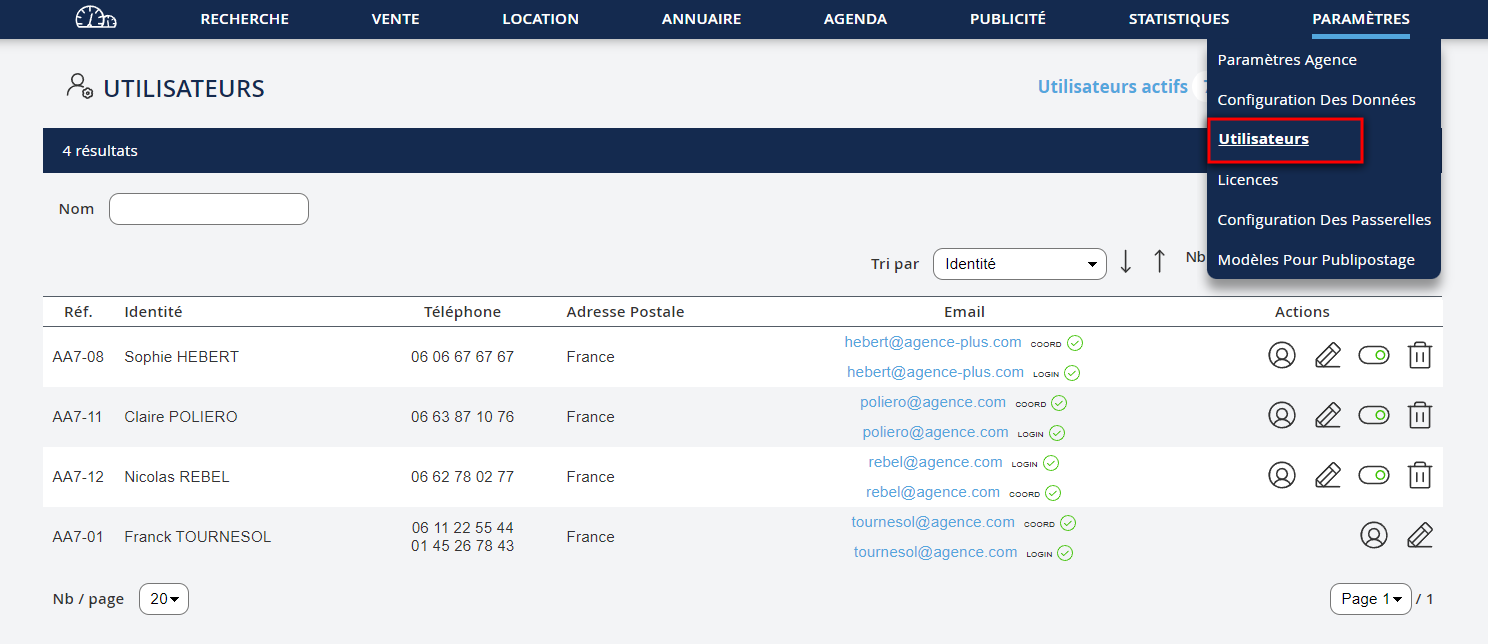
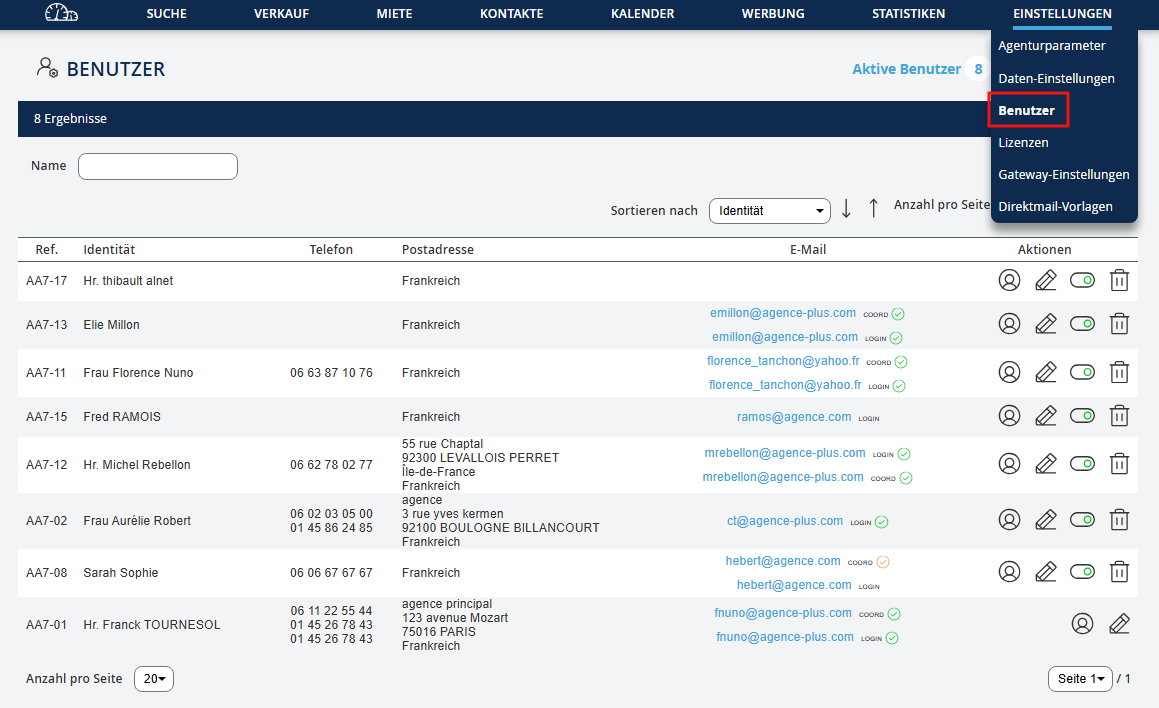
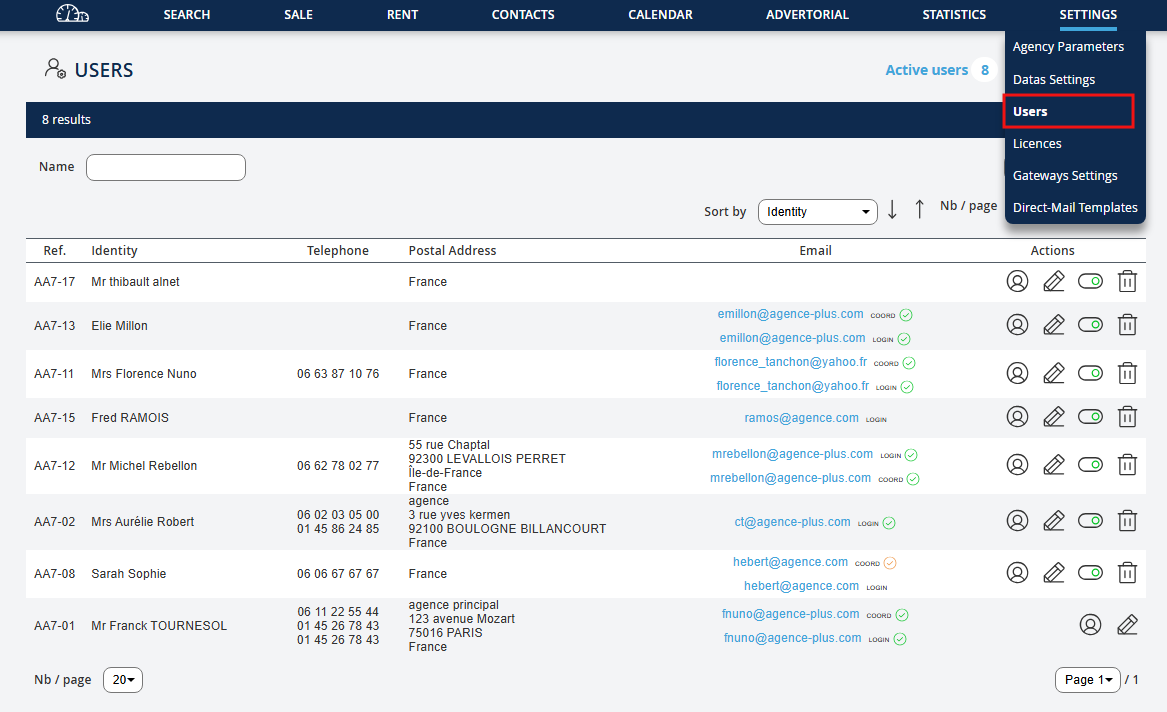
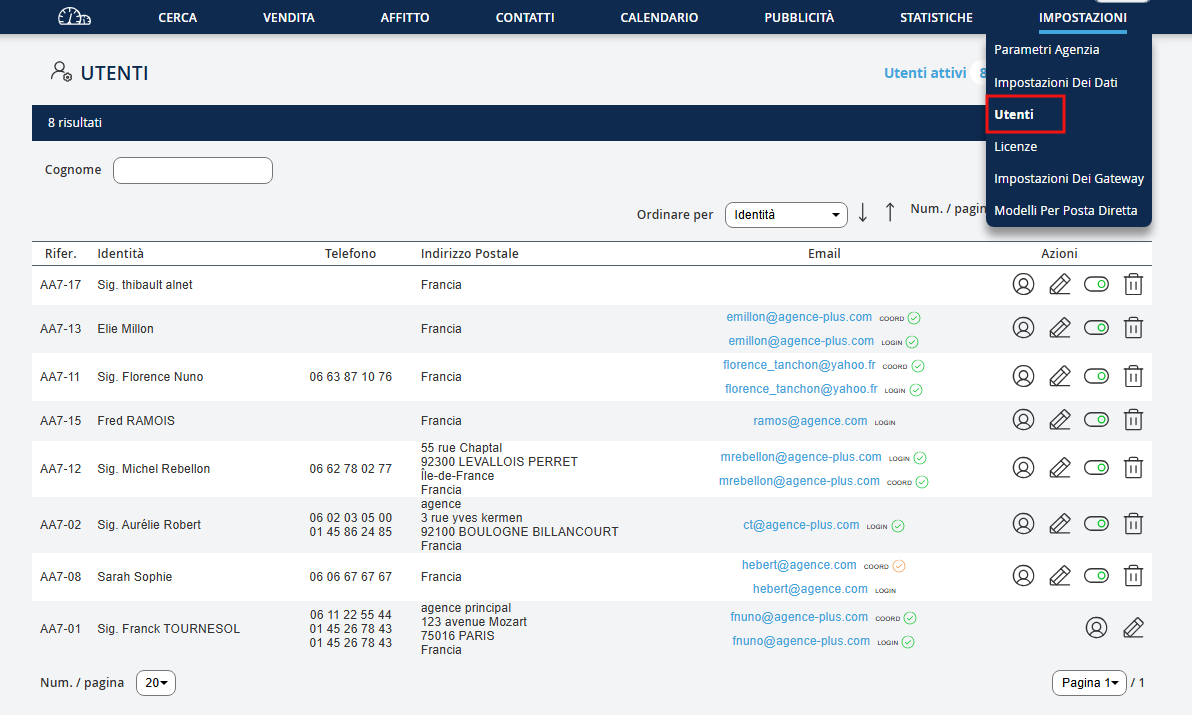
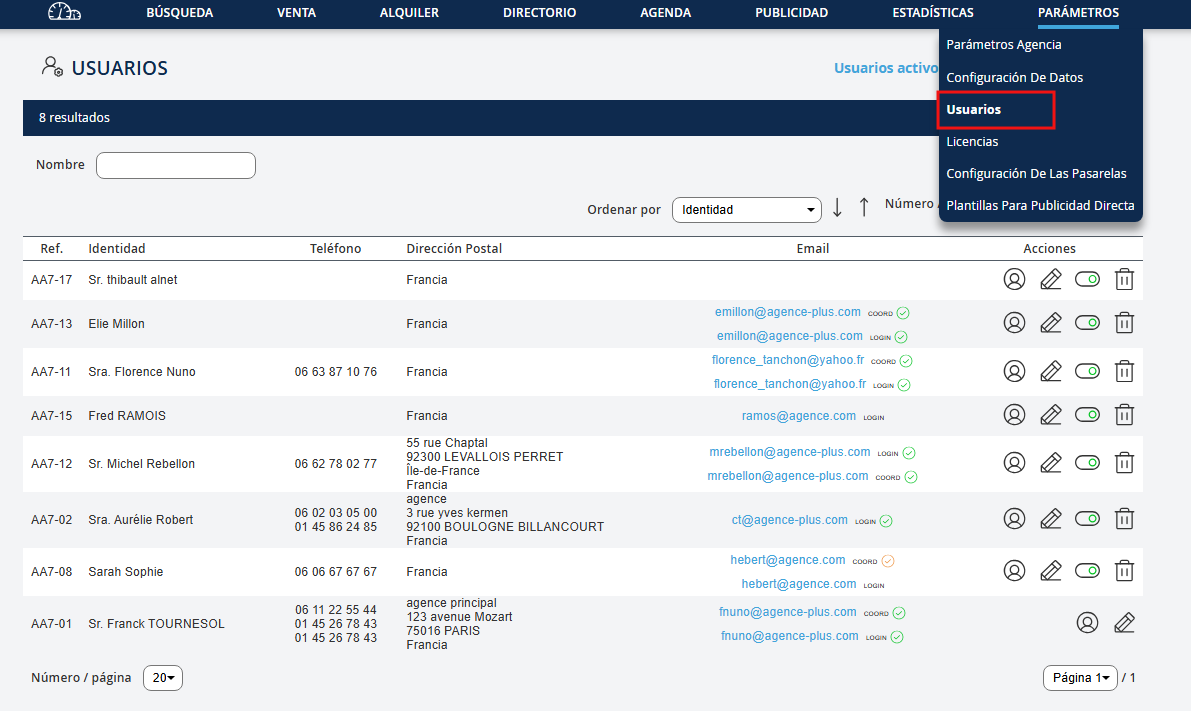
Allez dans Paramètres puis Utilisateurs
Gehen Sie zu Parameter und dann zu Benutzer
Go to Settings and then Users
Go to Settings and then Users
Vai su Impostazioni e poi su Utenti
Vá a Definições e depois a Utilizadores
Vaya a Configuración y luego a Usuarios

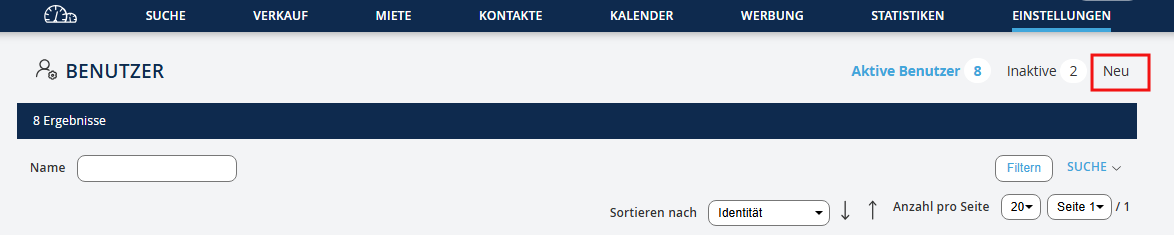
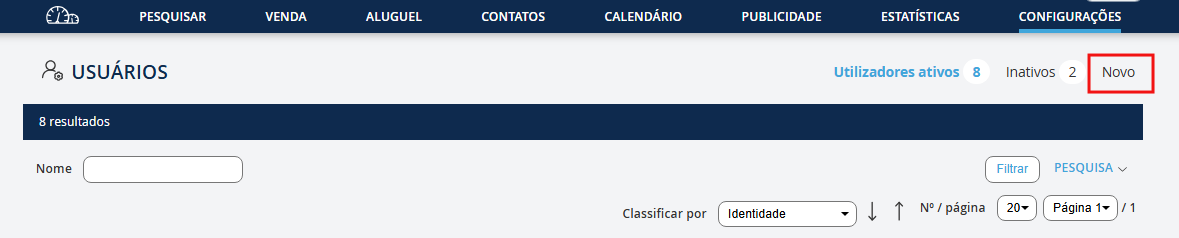
Ensuite, cliquez sur Nouveau pour créer ce nouvel utilisateur
Klicken Sie dann auf Neu, um diesen neuen Benutzer zu erstellen
Next, click on New to create this new user
Next, click on New to create this new user
Successivamente, clicca su Nuovo per creare questo nuovo utente
Em seguida, clique em Novo para criar este novo utilizador
Luego, haga clic en Nuevo para crear este nuevo usuario


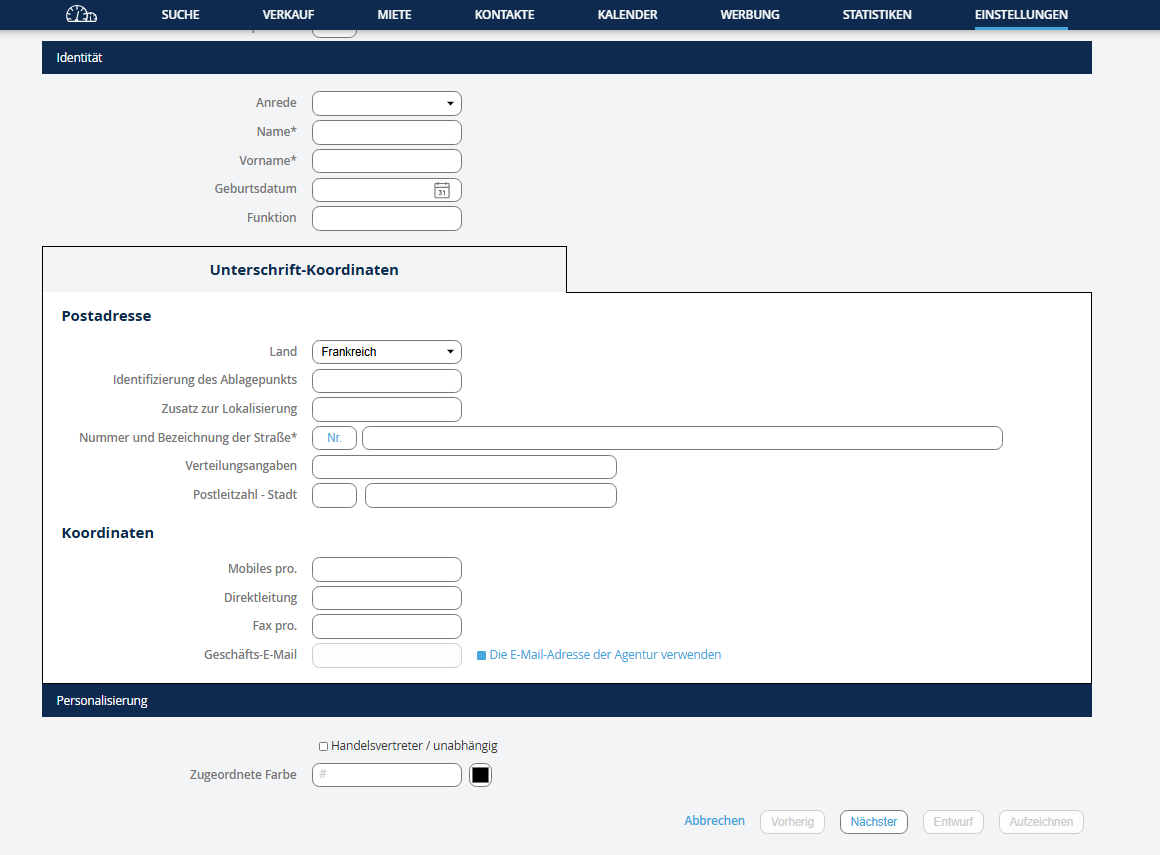
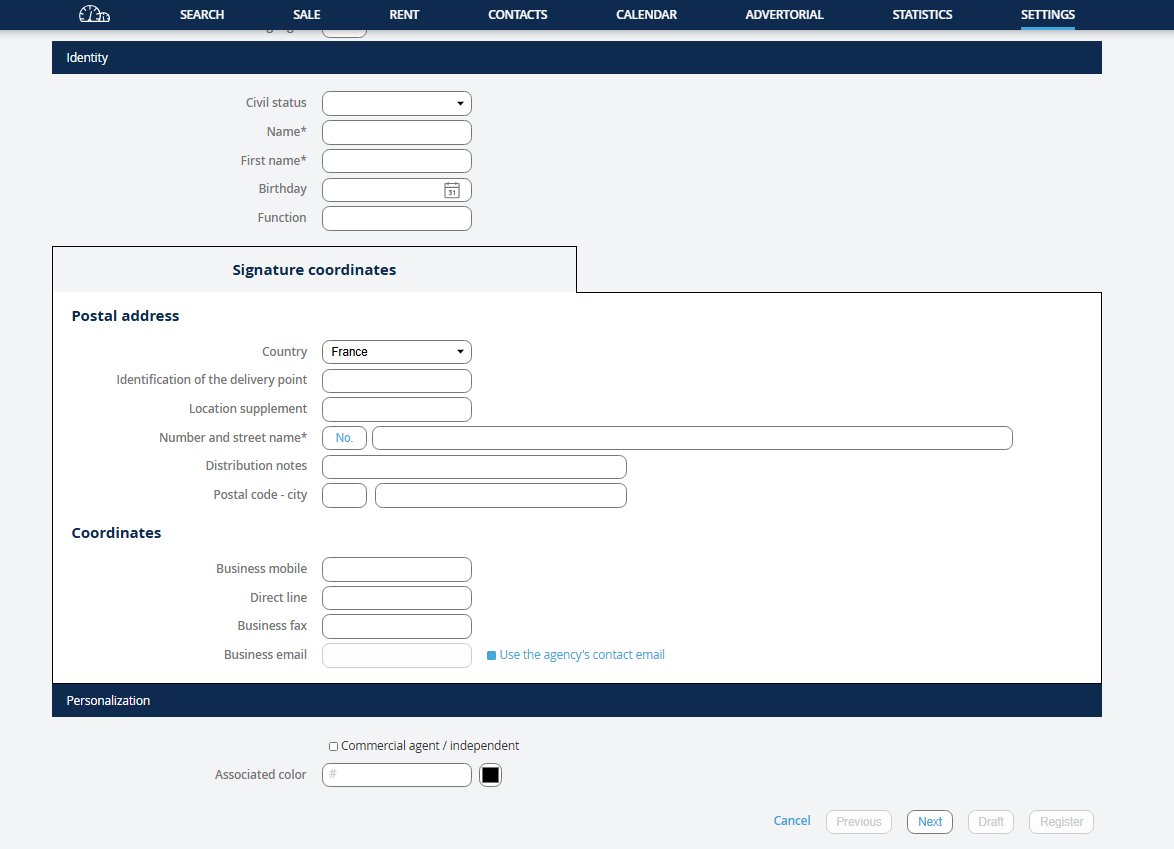
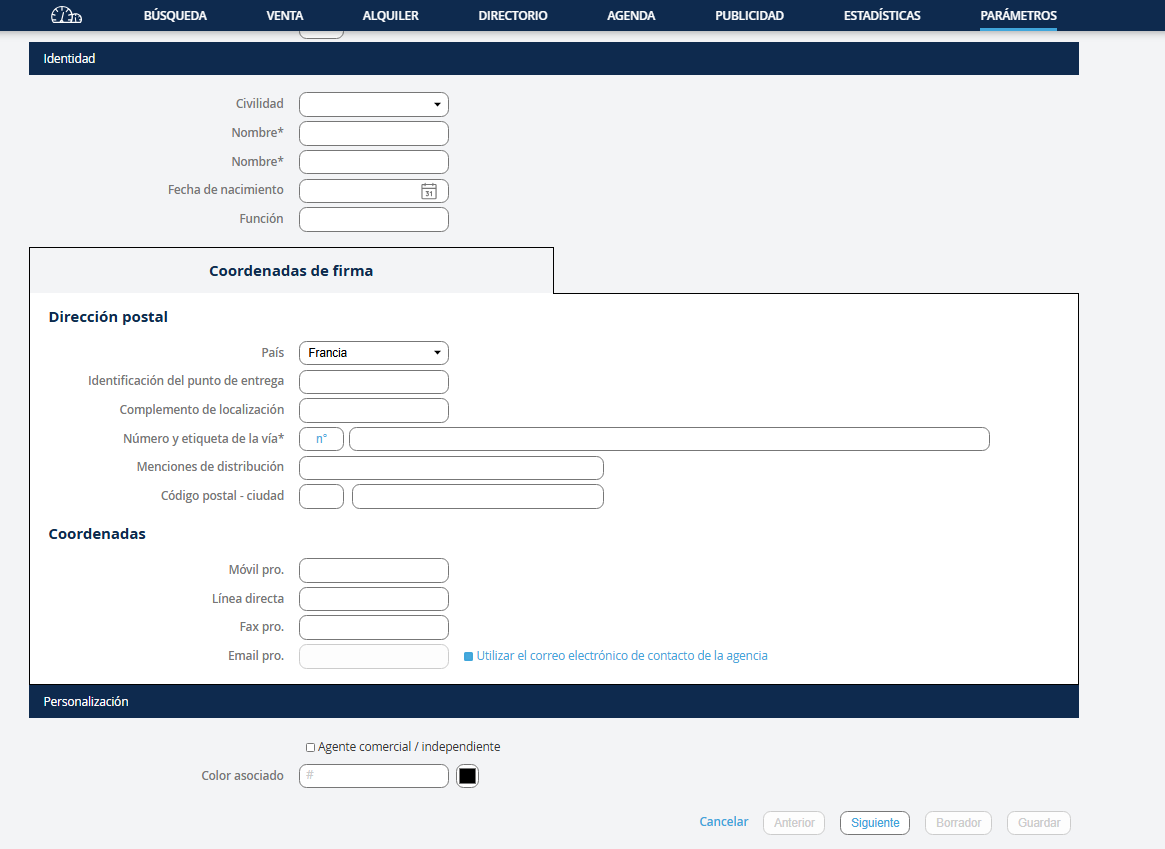
Pour les comptes déjà existant veuillez cliquez sur le crayon pour commencer la validation de vos adresses mails. Vous arrivez dans coordonnées de signature inscrivez toutes les coordonnées : téléphone, mail etc... (sachant que ces informations apparaitront sur les fiches clients envoyées par le négociateur si elles sont renseignées) Indiquez la couleur d'agenda partagé dans la rubrique personnalisation. Quand vous inscrivez l'adresse mail de l'utilisateur une notification vous indiquera qu'un mail lui a été adressé. L'utilisateur doit alors valider son adresse en cliquant sur le bouton disponible dans ce mail. Dès que la coche verte apparaît près du champ emailpro, l'adresse est validée, cliquez sur suivant.
Für bereits bestehende Konten klicken Sie auf den Stift, um mit der Validierung Ihrer E-Mail-Adressen zu beginnen. Sie gelangen zu den Signaturdaten, geben Sie alle Daten ein: Telefon, E-Mail usw... (diese Informationen erscheinen auf den Kundenblättern, die vom Verhandler gesendet werden, wenn sie ausgefüllt sind) Geben Sie die Farbe des gemeinsam genutzten Kalenders im Abschnitt Personalisierung an. Wenn Sie die E-Mail-Adresse des Benutzers eingeben, erhalten Sie eine Benachrichtigung, dass eine E-Mail an ihn gesendet wurde. Der Benutzer muss dann seine Adresse validieren, indem er auf die Schaltfläche in dieser E-Mail klickt. Sobald das grüne Häkchen neben dem Feld emailpro erscheint, ist die Adresse validiert, klicken Sie auf Weiter.
For existing accounts, click on the pencil to start validating your email addresses. You arrive at signature details, enter all the details: phone, email, etc... (these details will appear on the client forms sent by the negotiator if filled in Indicate the color of the shared calendar in the customization section. When you enter the user's email address, a notification will tell you that an email has been sent to them. The user must then validate their address by clicking the button in the email. Once the green checkmark appears next to the emailpro field, the address is validated, click Next.
For existing accounts, click on the pencil to start validating your email addresses. You arrive at signature details, enter all the details: phone, email, etc... (these details will appear on the client forms sent by the negotiator if filled in Indicate the color of the shared calendar in the customization section. When you enter the user's email address, a notification will tell you that an email has been sent to them. The user must then validate their address by clicking the button in the email. Once the green checkmark appears next to the emailpro field, the address is validated, click Next.
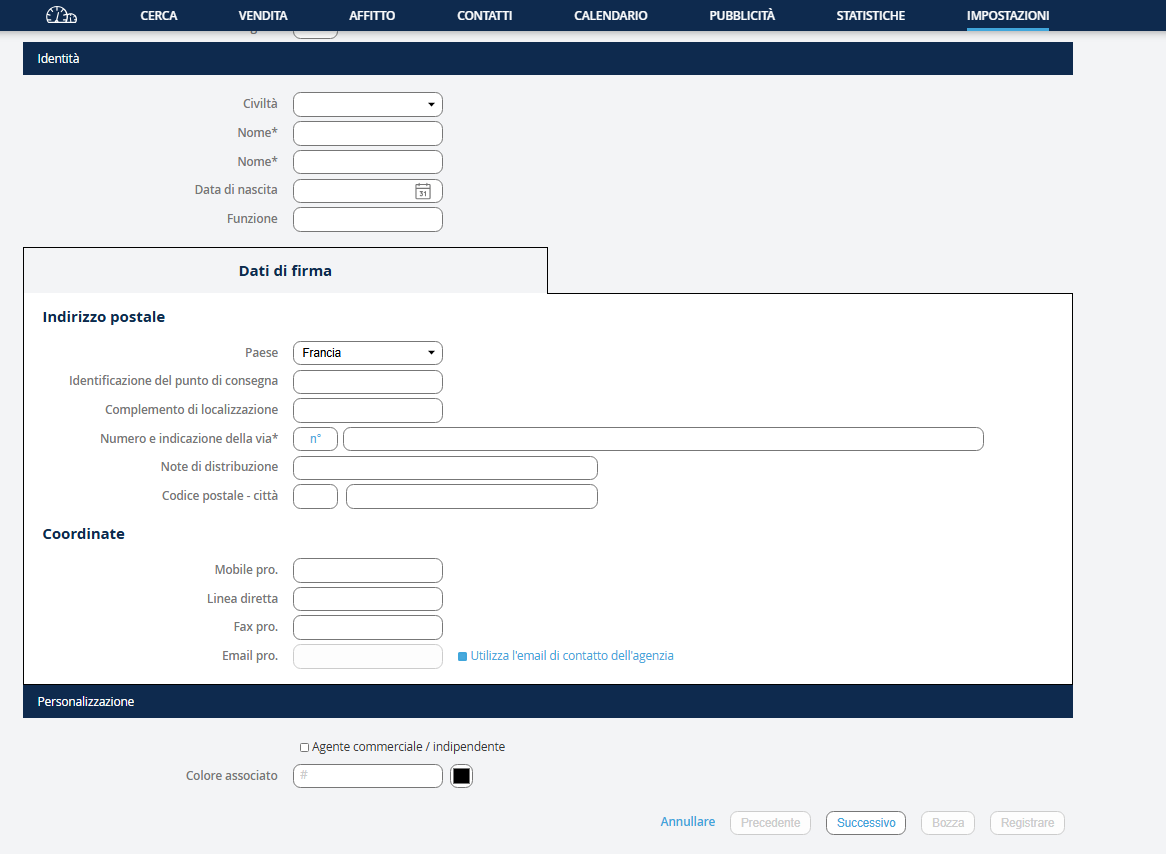
Per i conti già esistenti, fai clic sulla matita per iniziare a convalidare i tuoi indirizzi email. Arrivi ai dati di firma, inserisci tutti i dettagli: telefono, e-mail, ecc... (queste informazioni appariranno sui moduli dei clienti inviati dal negoziatore se sono compilate) Indica il colore del calendario condiviso nella sezione personalizzazione. Quando inserisci l'indirizzo email dell'utente, una notifica ti indicherà che è stato inviato un'email. L'utente deve quindi convalidare il proprio indirizzo cliccando sul pulsante disponibile in questa email. Non appena appare il segno di spunta verde accanto al campo emailpro, l'indirizzo è convalidato, clicca su avanti.
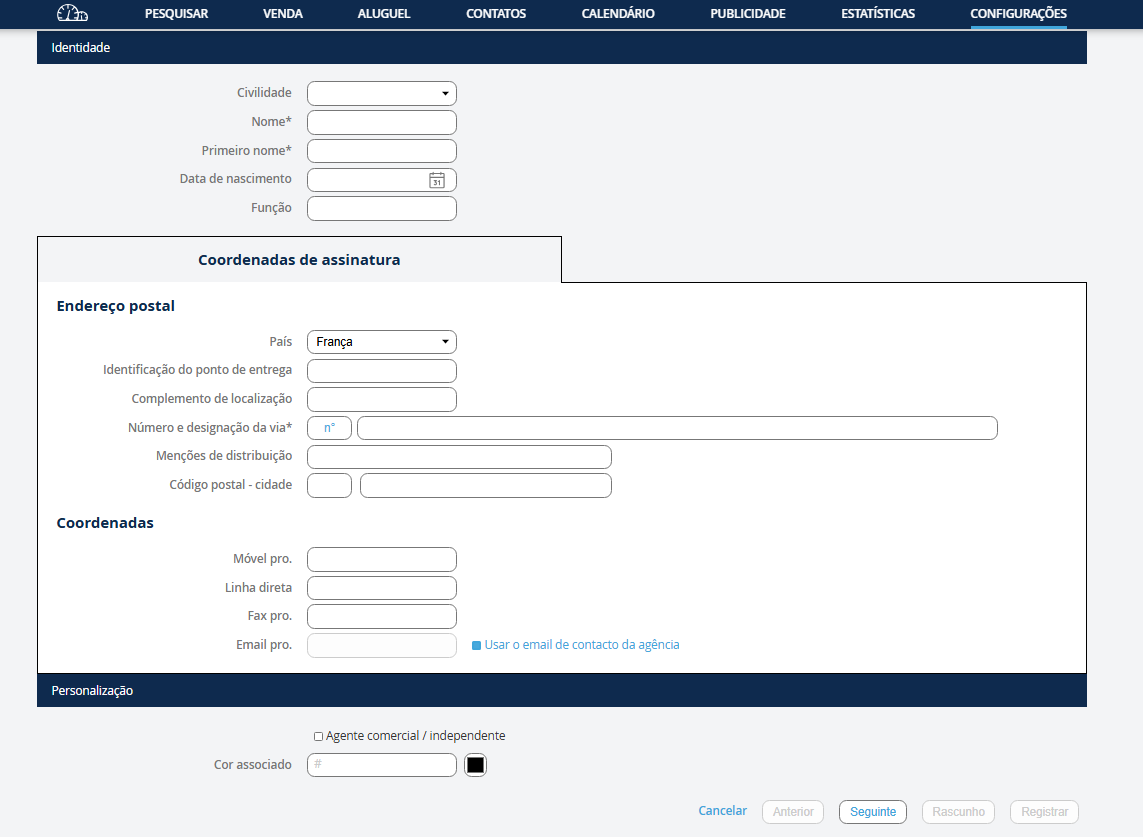
Para contas já existentes, clique no lápis para começar a validar os seus endereços de email. Chegará aos detalhes da assinatura, insira todos os dados: telefone, e-mail, etc... (essas informações aparecerão nas fichas dos clientes enviadas pelo negociador, se forem preenchidas) Indique a cor da agenda partilhada na secção de personalização. Quando inserir o endereço de e-mail do utilizador, será notificado de que um e-mail foi enviado para ele. O utilizador deve então validar o seu endereço clicando no botão disponível neste e-mail. Assim que o símbolo verde aparecer ao lado do campo emailpro, o endereço estará validado, clique em Seguinte.
Para cuentas ya existentes, haga clic en el lápiz para comenzar a validar sus direcciones de correo electrónico. Llega a los detalles de la firma, ingrese todos los detalles: teléfono, correo electrónico, etc... (estos datos aparecerán en los formularios de clientes enviados por el negociador si están completados) Indique el color de la agenda compartida en la sección de personalización. Cuando ingreses la dirección de correo electrónico del usuario, recibirás una notificación indicando que se le ha enviado un correo. El usuario debe validar su dirección haciendo clic en el botón disponible en ese correo. Cuando aparezca la marca de verificación verde junto al campo emailpro, la dirección estará validada, haz clic en siguiente.
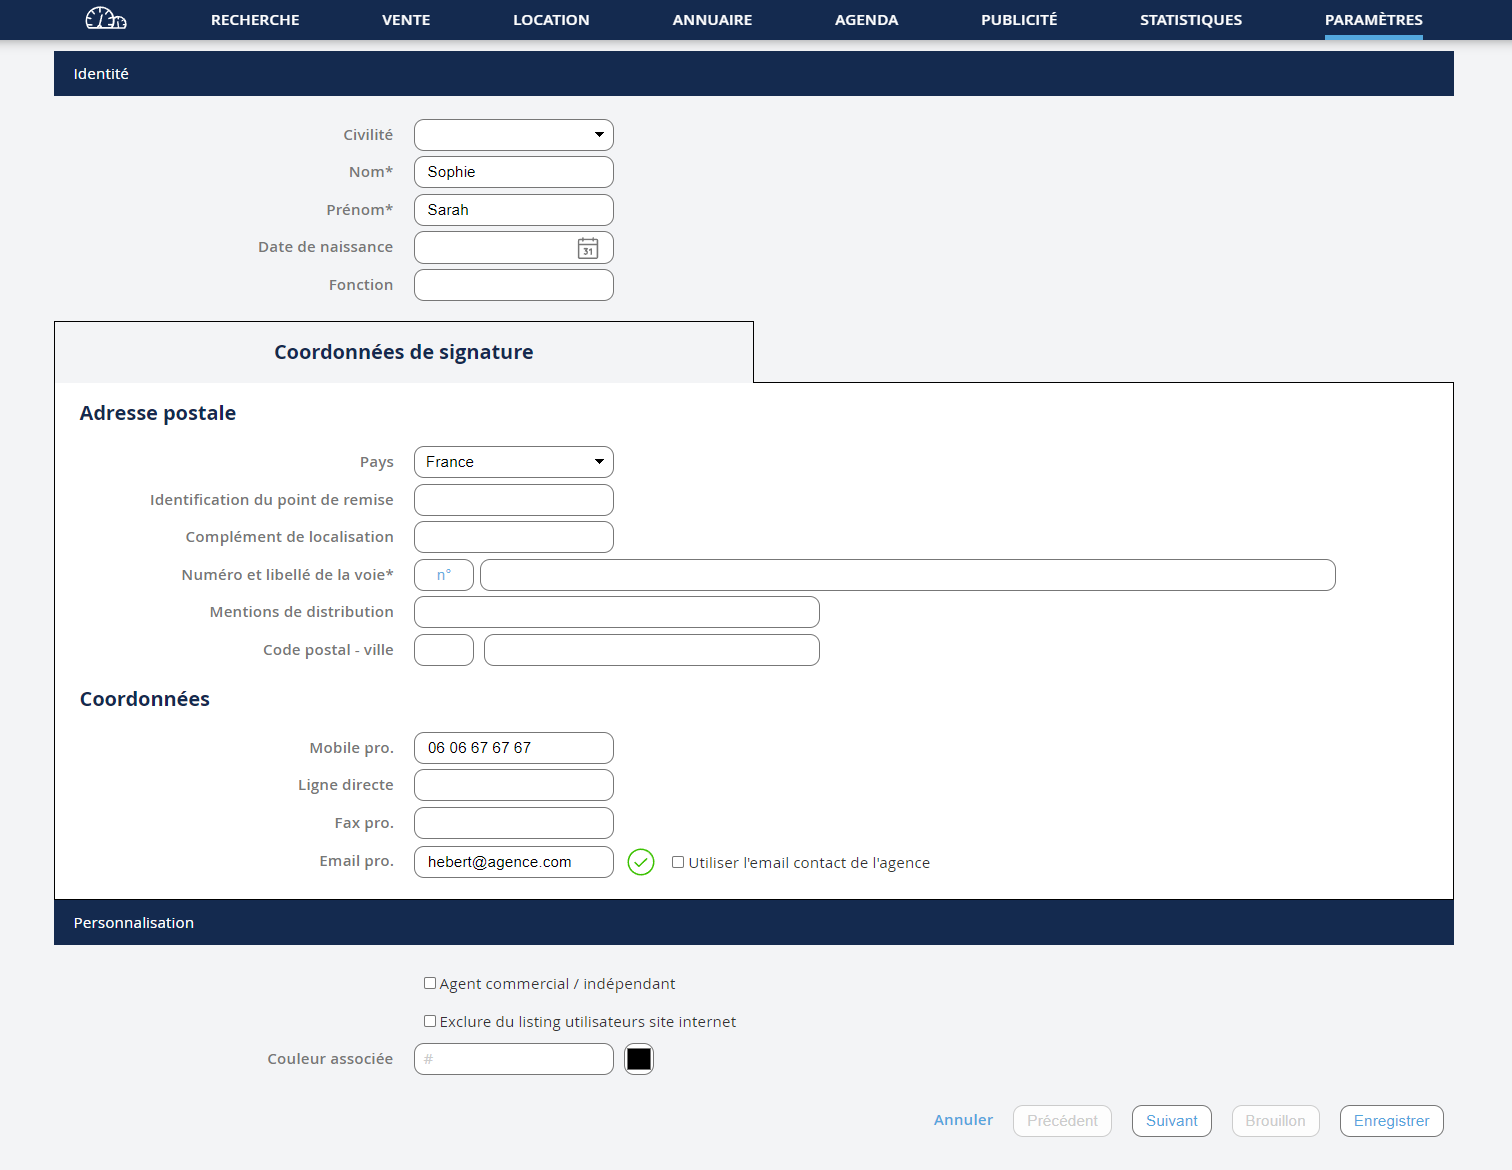
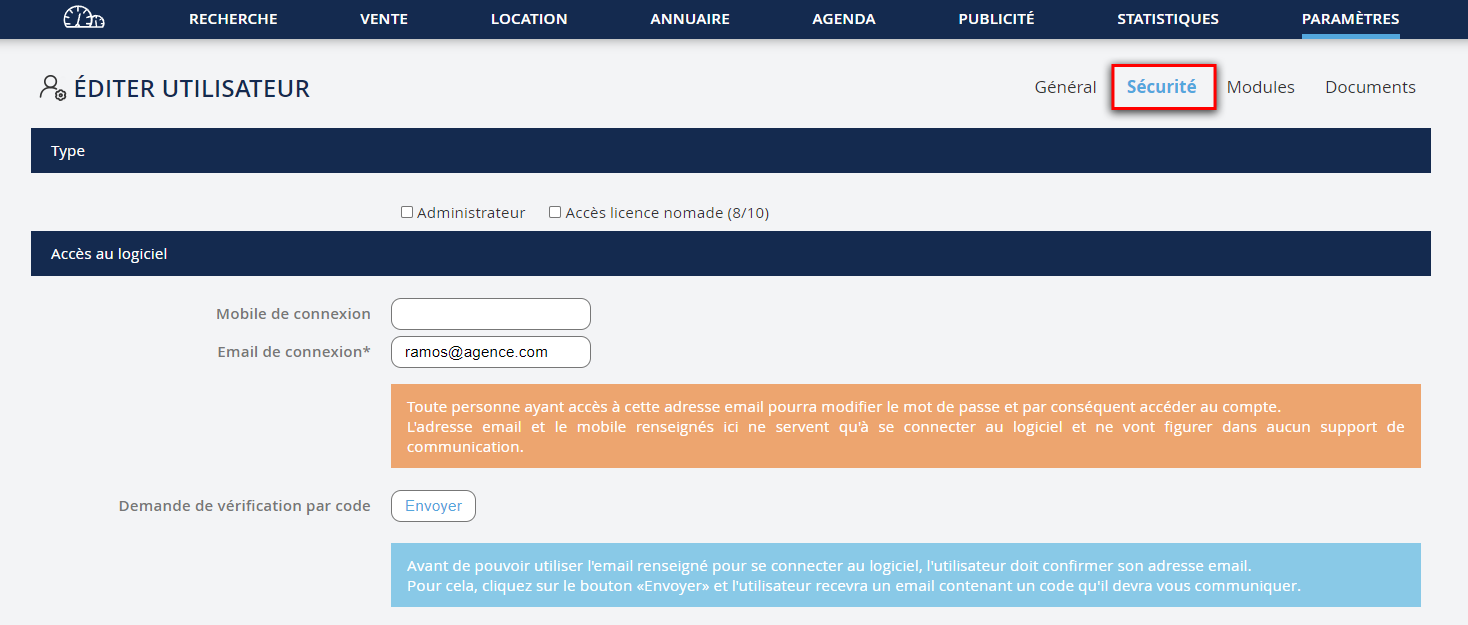
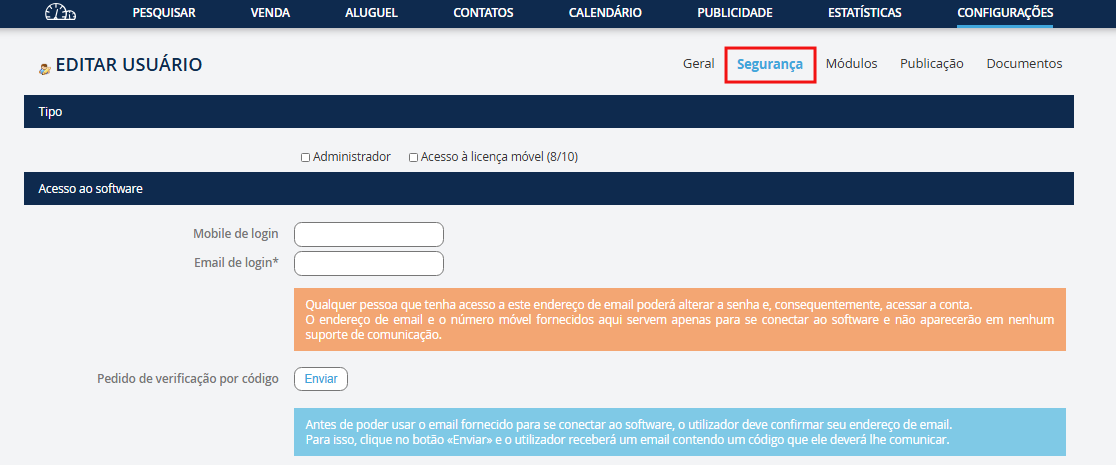
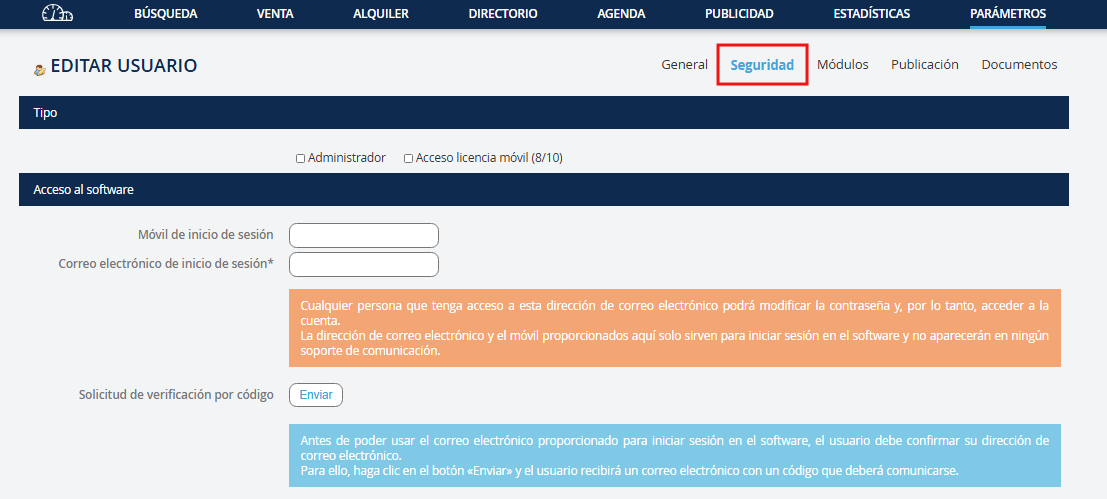
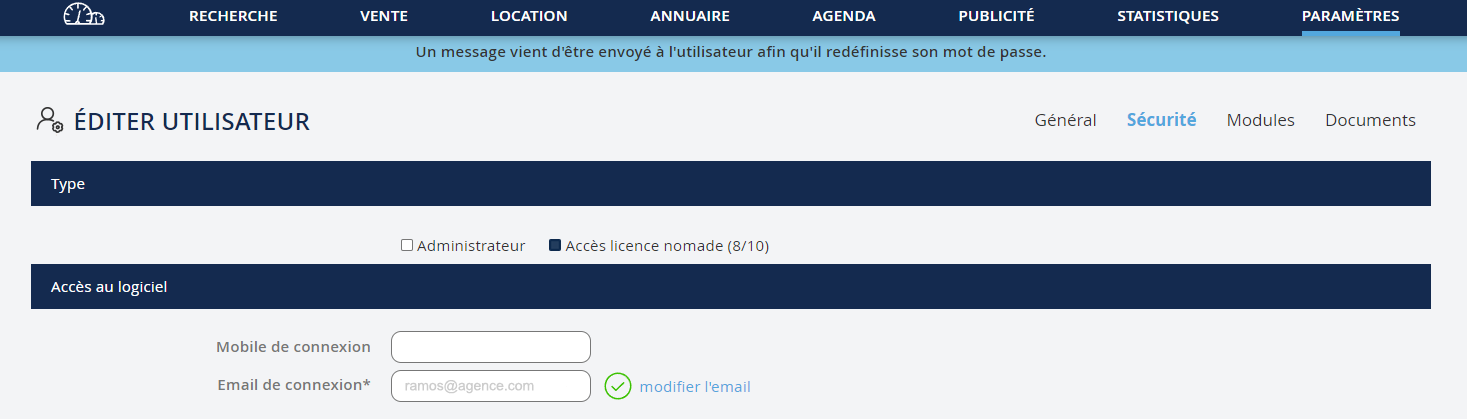
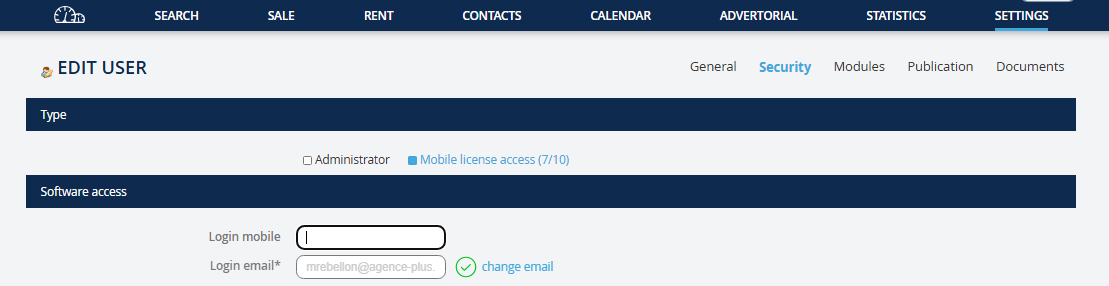
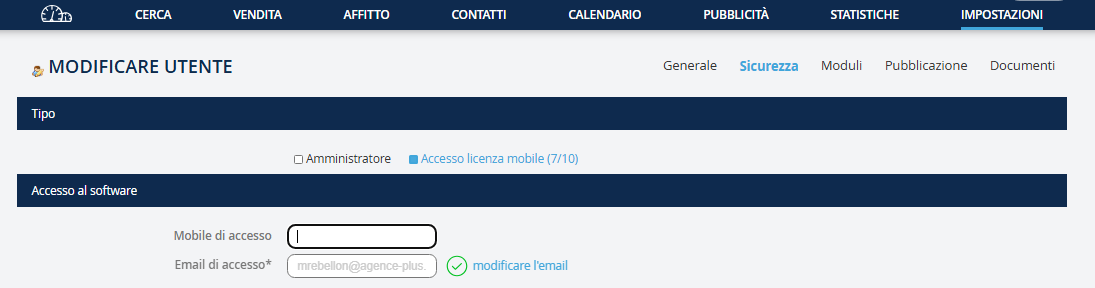
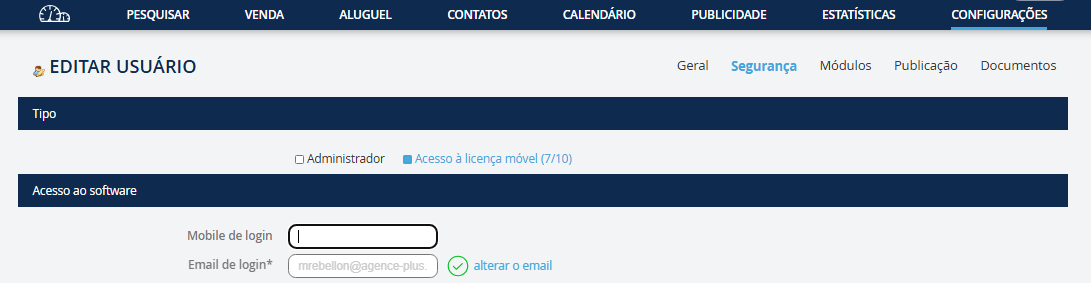
Après avoir cliqué sur suivant vous arrivez dans l'onglet sécurité. Dans cet onglet, vous pouvez paramétrer les droits et renseigner les identifiants de connexion de l'utilisateur. Cochez administrateur si l'utilisateur doit disposer de ce droit (facultatif) Cochez accès licence nomade. (ne pas cocher si vous disposez d'une licence permanente) Saisir l'adresse Email servant d'identifiant (cette adresse peut être identique à l'adresse de signature ou être différente) Cliquez sur envoyer. Un email est alors adressé à l'utilisateur contenant le code de vérification.
Nachdem Sie auf Weiter geklickt haben, gelangen Sie zum Tab Sicherheit. In diesem Tab können Sie die Rechte einstellen und die Anmeldedaten des Benutzers eingeben. Aktivieren Sie Administrator, wenn der Benutzer dieses Recht haben soll (optional) Aktivieren Sie Nomadic License Access. (nicht aktivieren, wenn Sie eine permanente Lizenz haben) Geben Sie die Email Adresse ein, die als Benutzerkennung dient (diese Adresse kann identisch mit der Signaturadresse sein oder unterschiedlich) Klicken Sie auf Absenden. Eine E-Mail wird dann an den Benutzer gesendet, die einen Verifizierungscode enthält.
After clicking Next, you will arrive at the Security tab. In this tab, you can configure the rights and enter the user's login credentials. Check Administrator if the user should have this right (optional) Check Nomadic License Access. (do not check if you have a permanent license) Enter the Email address to be used as the login (this address can be the same as the signature address or different) Click Send. An email will be sent to the user containing the verification code.
After clicking Next, you will arrive at the Security tab. In this tab, you can configure the rights and enter the user's login credentials. Check Administrator if the user should have this right (optional) Check Nomadic License Access. (do not check if you have a permanent license) Enter the Email address to be used as the login (this address can be the same as the signature address or different) Click Send. An email will be sent to the user containing the verification code.
Dopo aver cliccato su Avanti, arriverai nella scheda Sicurezza. In questa scheda, puoi configurare i diritti e inserire le credenziali di accesso dell'utente. Seleziona Amministratore se l'utente deve avere questo diritto (facoltativo) Seleziona Accesso Licenza Nomade. (non selezionare se si dispone di una licenza permanente) Inserisci l'indirizzo Email da utilizzare come identificativo (questo indirizzo può essere identico all'indirizzo di firma o diverso) Clicca su Invia. Un'email verrà inviata all'utente contenente il codice di verifica.
Após clicar em Avançar, você chegará na guia Segurança. Nesta guia, você pode configurar os direitos e inserir as credenciais de login do usuário. Marque Administrador se o usuário deve ter esse direito (opcional) Marque Acesso à Licença Nomada. (não marque se você tiver uma licença permanente) Insira o endereço de Email a ser usado como identificador (este endereço pode ser o mesmo que o endereço de assinatura ou ser diferente) Clique em Enviar. Um e-mail será enviado para o usuário contendo o código de verificação.
Después de hacer clic en Siguiente, llegarás a la pestaña Seguridad. En esta pestaña, puedes configurar los derechos e ingresar las credenciales de inicio de sesión del usuario. Marca Administrador si el usuario debe tener este derecho (opcional) Marca Acceso a Licencia Nómada. (no lo marques si tienes una licencia permanente) Ingresa la dirección de Email que servirá como identificador (esta dirección puede ser la misma que la dirección de firma o diferente) Haz clic en Enviar. Se enviará un correo electrónico al usuario con el código de verificación.

Renseigner le code de vérification et cliquez sur valider.
Geben Sie den Verifizierungscode ein und klicken Sie auf Bestätigen.
Enter the verification code and click Validate.
Enter the verification code and click Validate.
Inserisci il codice di verifica e clicca su Conferma.
Introduza o código de verificação e clique em Validar.
Ingrese el código de verificación y haga clic en Validar.
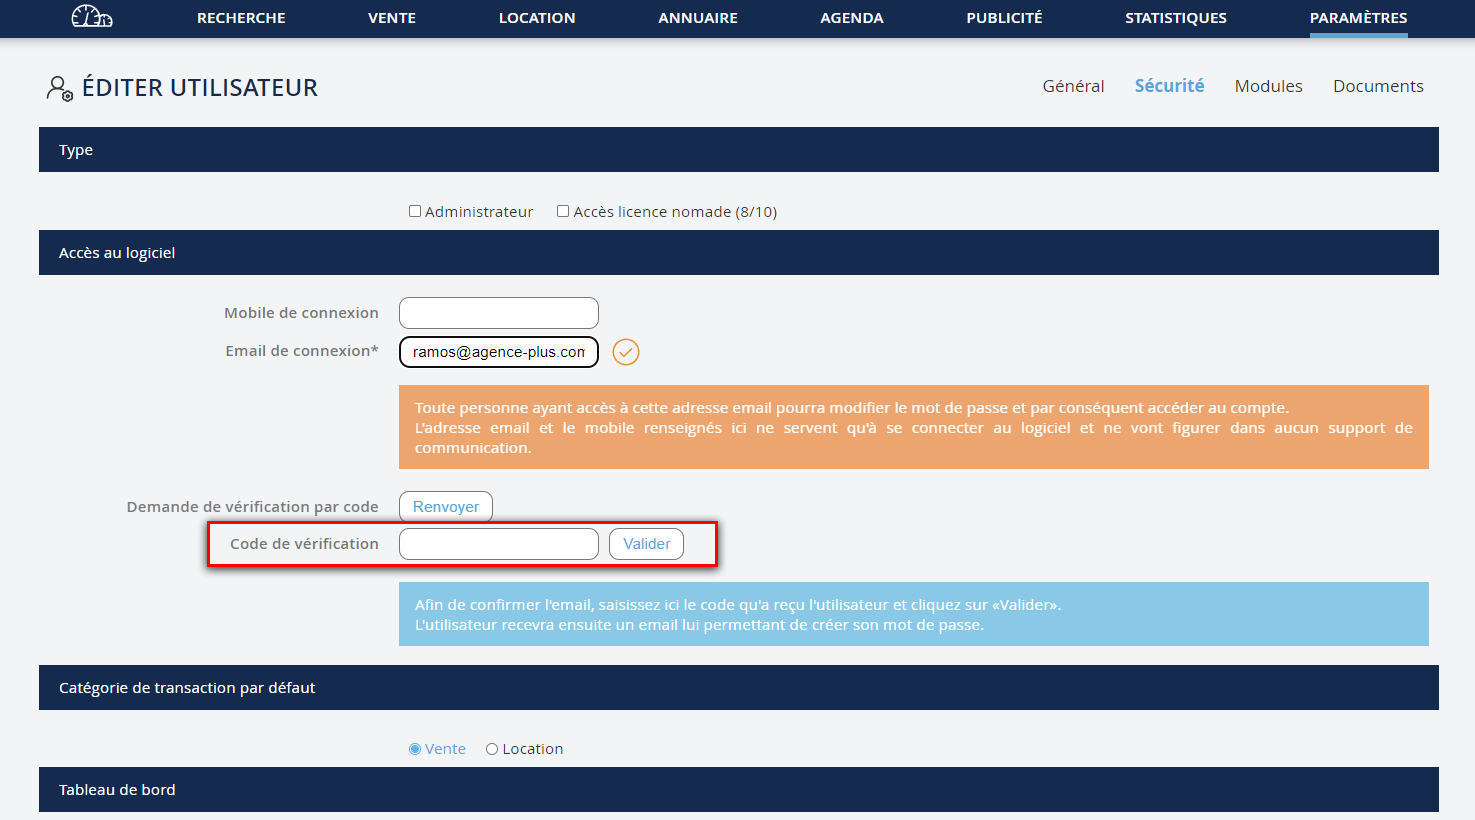
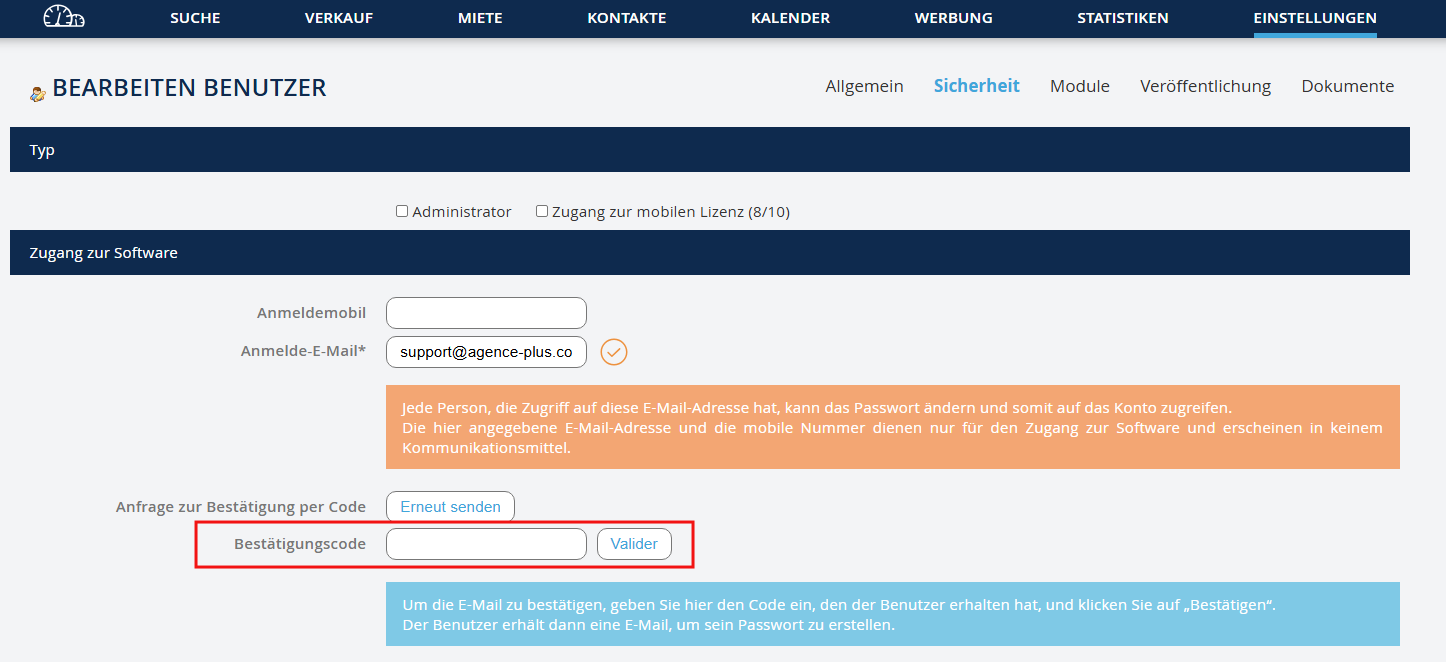
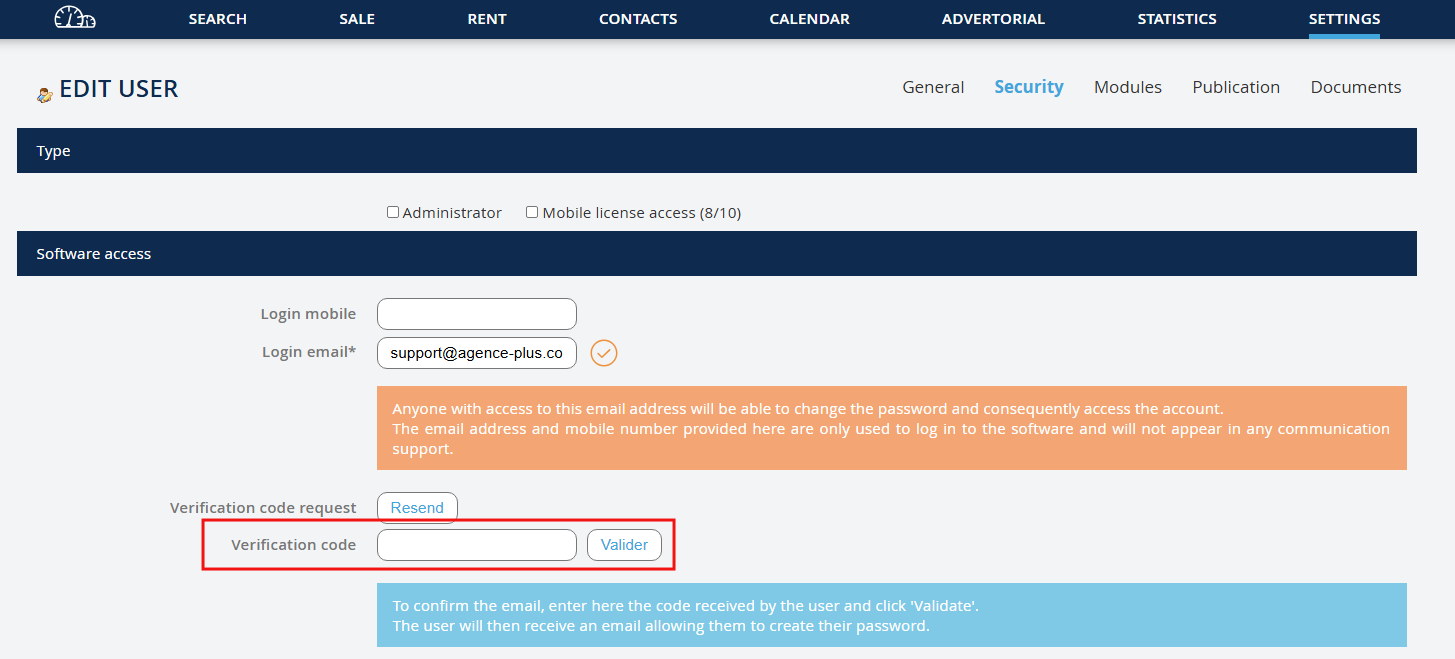
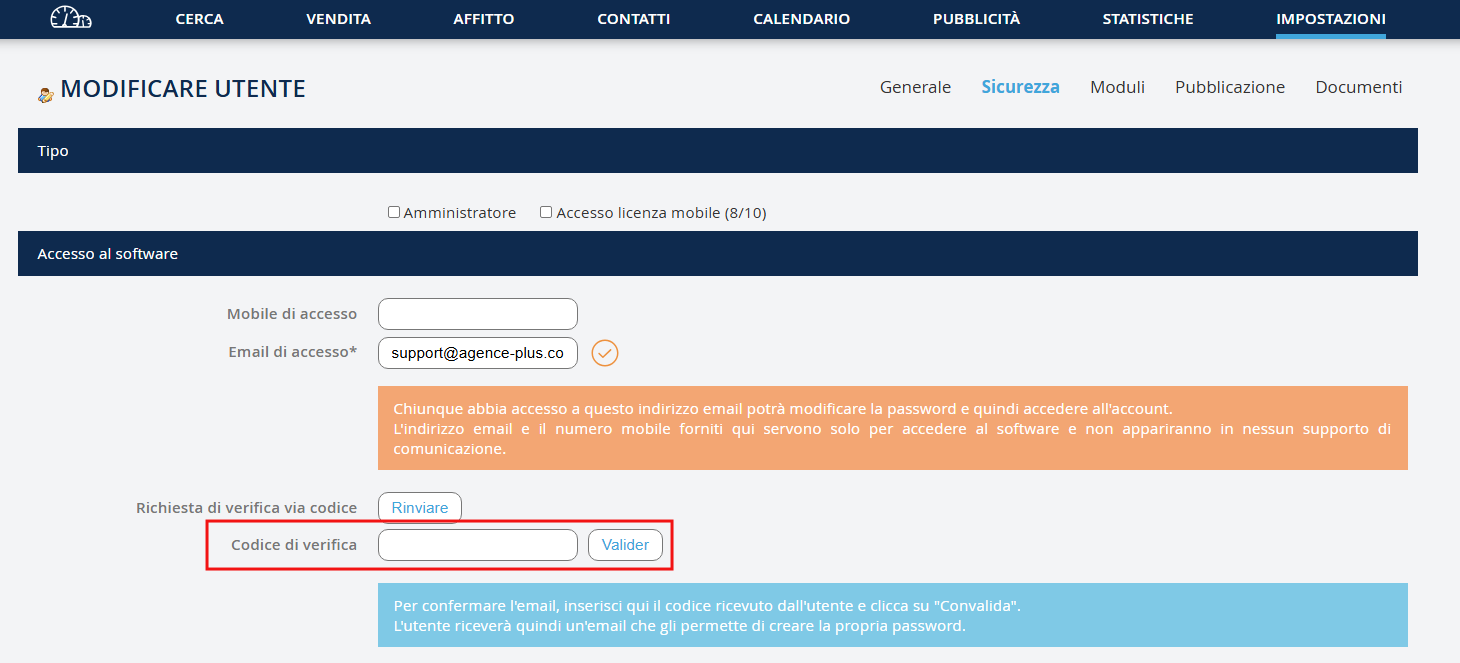
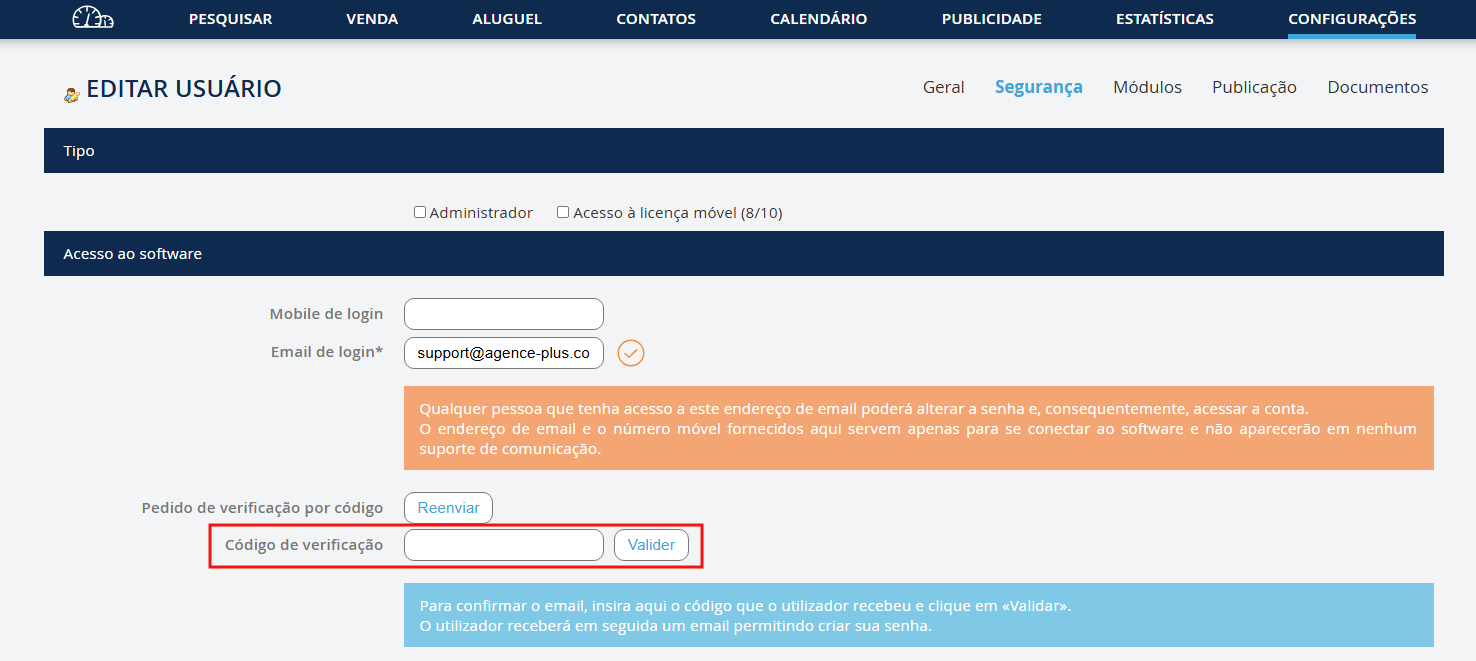
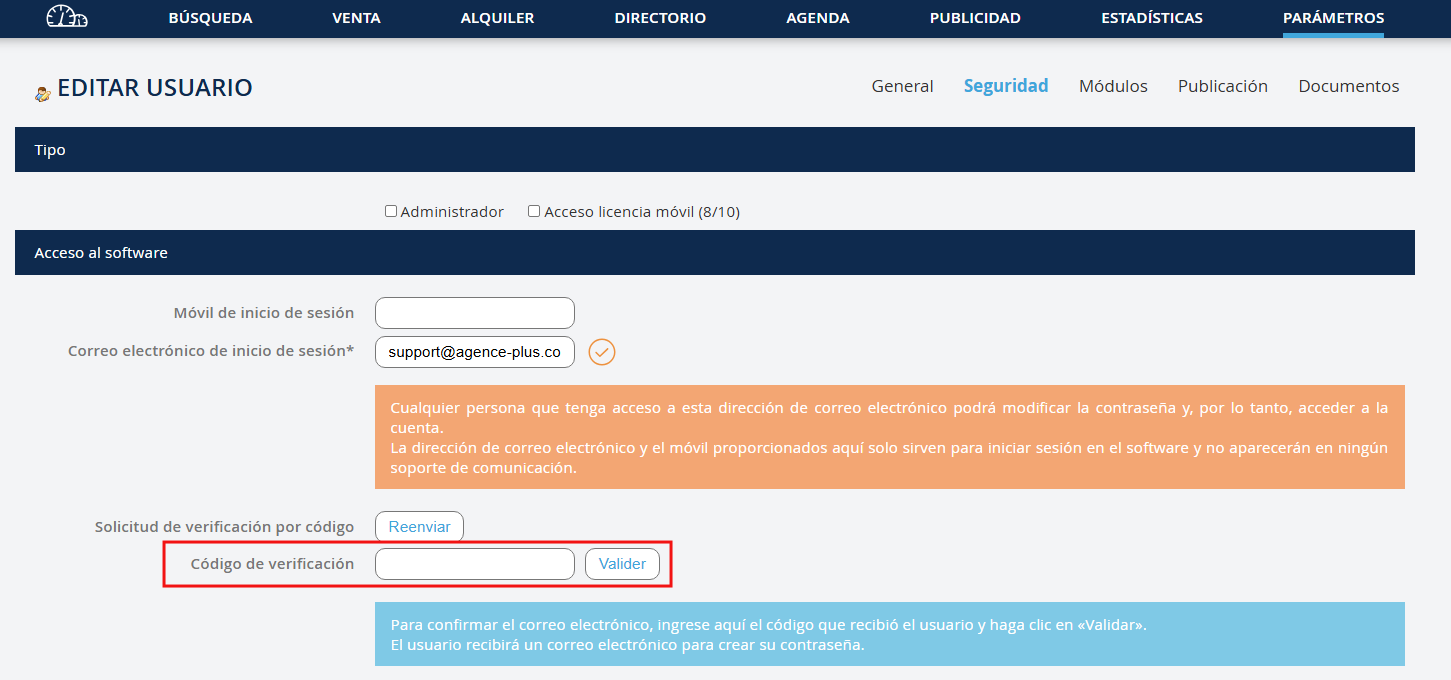
Une notification bleu apparaitra. Un nouveau mail sera alors adressé à l'utilisateur afin de définir son mot de passe.
Eine blaue Benachrichtigung wird angezeigt. Eine neue E-Mail wird dann an den Benutzer gesendet, um sein Passwort festzulegen.
A blue notification will appear. A new email will then be sent to the user to set their password.
A blue notification will appear. A new email will then be sent to the user to set their password.
Comparirà una notifica blu. Verrà quindi inviata una nuova email all'utente per definire la sua password.
Apresentar-se-á uma notificação azul. Será então enviado um novo e-mail ao utilizador para definir a sua palavra-passe.
Aparecerá una notificación azul. Luego se enviará un nuevo correo electrónico al usuario para definir su contraseña.

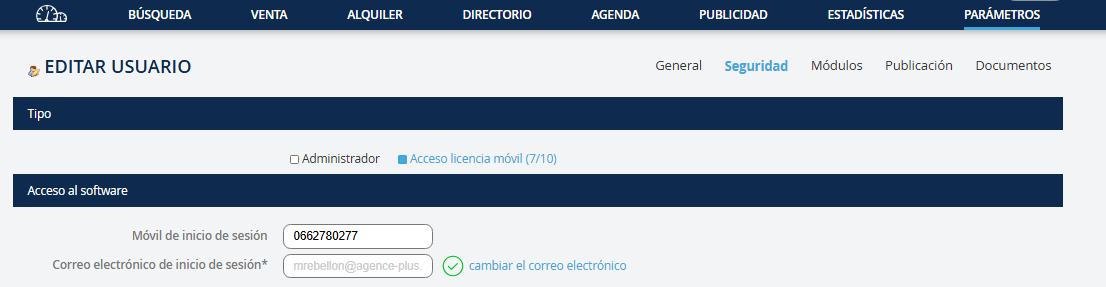
NB : Vous pouvez également renseigner le numéro de portable de l'utilisateur. Celui-ci, après les étapes de validation de l'adresse email et et de la création du mot de passe, pourra alors être utiliser comme identifiant de connexion.
Hinweis: Sie können auch die Handynummer des Benutzers eingeben. Diese kann nach den Schritten zur Bestätigung der E-Mail-Adresse und der Erstellung des Passworts als Anmeldekennung verwendet werden.
Note: You can also enter the user's mobile number. This can then be used as the login identifier after the email address validation and password creation steps.
Note: You can also enter the user's mobile number. This can then be used as the login identifier after the email address validation and password creation steps.
Nota: Puoi anche inserire il numero di cellulare dell'utente. Questo potrà essere utilizzato come identificativo di accesso dopo la validazione dell'indirizzo e-mail e la creazione della password.
Nota: Pode também introduzir o número de telemóvel do utilizador. Este poderá ser utilizado como identificador de login após as etapas de validação do e-mail e criação da palavra-passe.
Nota: También puede introducir el número de móvil del usuario. Este podrá ser utilizado como identificador de acceso después de las etapas de validación de la dirección de correo electrónico y creación de la contraseña.
Lors de la connexion au logiciel, le négociateur doit respecter la saisie exacte des identifiants (email ou n°de portable) et du mot de passe tels que renseignés lors de leur création (les majuscules, miniscules etc... doivent être retranscrites de la même manière).
Bei der Anmeldung in der Software muss der Verhandlungspartner die genaue Eingabe der Identifikatoren (E-Mail oder Handynummer) und des Passworts befolgen, wie sie bei deren Erstellung angegeben wurden (Großbuchstaben, Kleinbuchstaben usw. müssen genau so eingegeben werden).
When logging into the software, the negotiator must enter the exact identifiers (email or mobile number) and password as entered during their creation (uppercase, lowercase, etc. must be entered the same way).
When logging into the software, the negotiator must enter the exact identifiers (email or mobile number) and password as entered during their creation (uppercase, lowercase, etc. must be entered the same way).
Quando accedi al software, il negoziatore deve rispettare l'inserimento esatto degli identificatori (email o numero di cellulare) e della password come sono stati inseriti durante la loro creazione (le maiuscole, le minuscole, ecc. devono essere trascritte nello stesso modo).
Ao fazer login no software, o negociador deve respeitar a entrada exata dos identificadores (email ou número de telemóvel) e da palavra-passe como foi indicado durante a sua criação (maiúsculas, minúsculas, etc., devem ser reproduzidas da mesma forma).
Al iniciar sesión en el software, el negociador debe ingresar los identificadores exactos (correo electrónico o número de móvil) y la contraseña tal como se ingresaron durante su creación (mayúsculas, minúsculas, etc., deben ingresarse de la misma manera).
AUTORISATIONS Si vous n’avez pas attribuer des droits administrateurs en cochant la case Administrateur, vous devez paramétrer les droits que vous souhaitez lui donner. Autorisations d’accès Concerne les données du négociateur
BEFUGNISSE Wenn Sie keine Administratorrechte vergeben haben, indem Sie das Feld "Administrator" angekreuzt haben, müssen Sie die Rechte festlegen, die Sie ihm gewähren möchten. Zugangsbefugnisse Betrifft die Daten des Verhandlungspartners
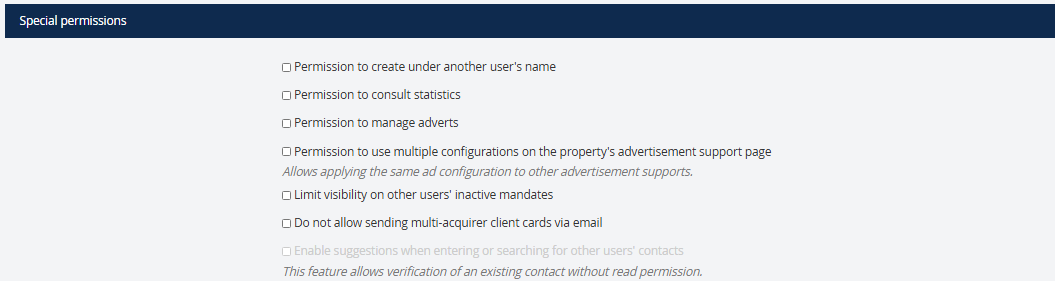
PERMISSIONS If you haven't granted administrator rights by checking the Administrator box, you need to set the rights you wish to assign. Access Permissions Concern the negotiator's data
PERMISSIONS If you haven't granted administrator rights by checking the Administrator box, you need to set the rights you wish to assign. Access Permissions Concern the negotiator's data
PERMESSI Se non avete assegnato i diritti da amministratore selezionando la casella Amministratore, dovrete impostare i diritti che desiderate assegnargli. Autorizzazioni di accesso Riguarda i dati del negoziatore
PERMISSÕES Se não tiver atribuído direitos de administrador ao marcar a caixa Administrador, deve configurar os direitos que deseja conceder-lhe. Permissões de acesso Relaciona-se com os dados do negociador
PERMISOS Si no ha otorgado derechos de administrador marcando la casilla Administrador, debe configurar los derechos que desea asignar. Permisos de acceso Abarca los datos del negociador


Autorisations spéciales
Spezielle Berechtigungen
Special Permissions
Special Permissions
Permessi speciali
Permissões especiais
Permisos especiales
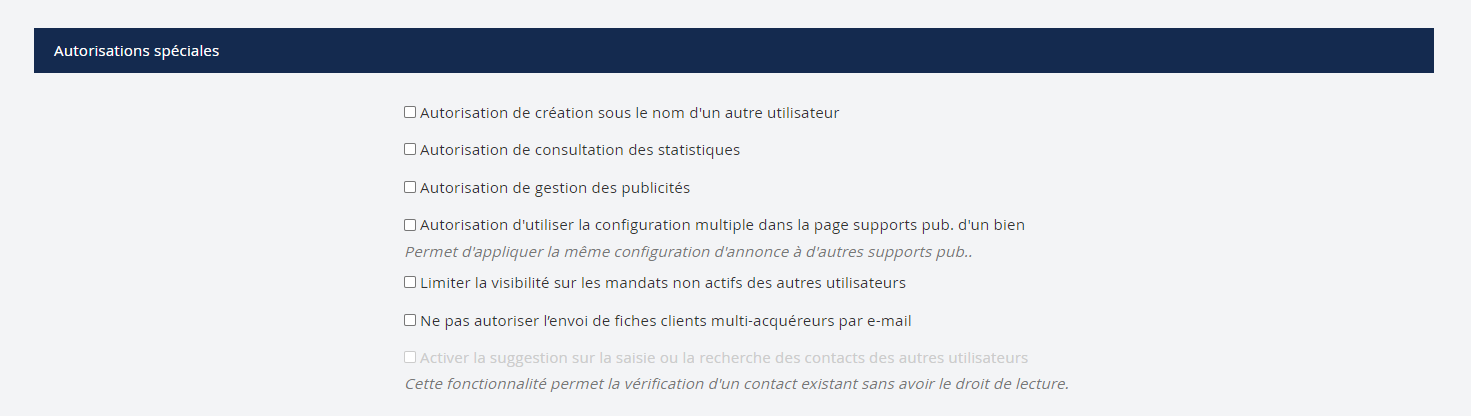
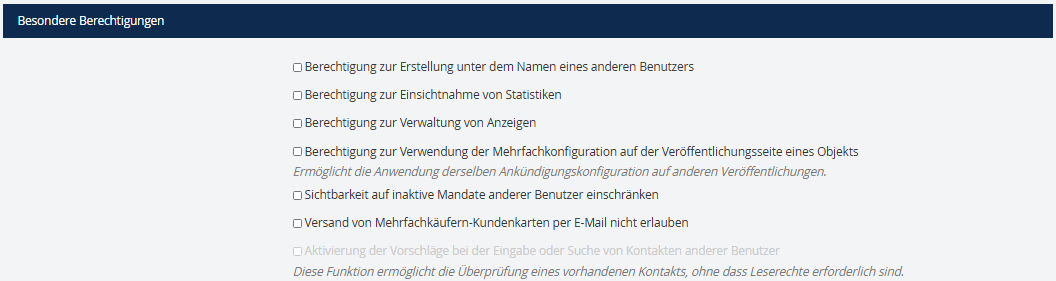
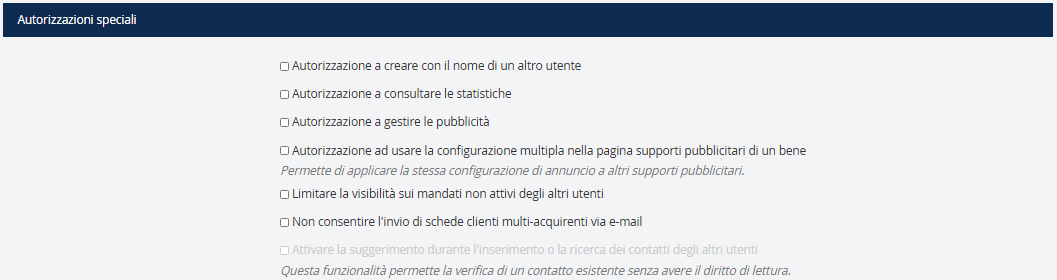
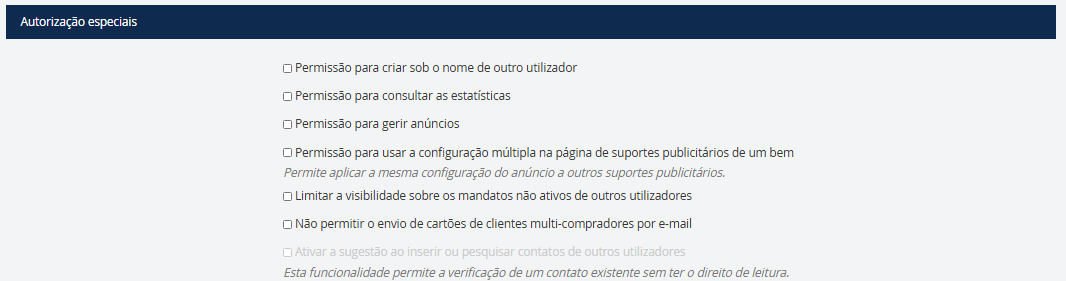
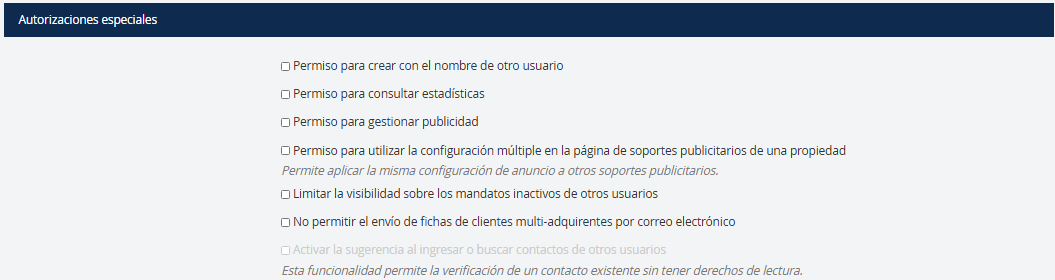
Ici cocher Limiter la visibilité…implique que le négociateur n’aura pas de visibilité sur les mandats qui sont en estimation/vendu/retiré etc..
Hier das Häkchen setzen bei "Einschränken der Sichtbarkeit"... bedeutet, dass der Verhandlungsführer keine Sichtbarkeit auf die Mandate hat, die in Schätzung/verkauft/entfernt usw. sind.
Here, checking "Limit visibility" means that the negotiator will not have visibility on the mandates that are in estimate/sold/withdrawn, etc.
Here, checking "Limit visibility" means that the negotiator will not have visibility on the mandates that are in estimate/sold/withdrawn, etc.
Qui, selezionando "Limitare la visibilità" implica che il negoziatore non avrà visibilità sui mandati che sono in stima/venduti/tolti ecc.
Aqui, ao marcar "Limitar visibilidade"... significa que o negociador não terá visibilidade sobre os mandatos que estão em estimativa/vendido/retirado etc.
Aquí, marcar "Limitar visibilidad"... significa que el negociador no tendrá visibilidad sobre los mandatos que están en estimación/vendido/retirado, etc.


Pour la Gestion de SMS, vous pourrez retrouver plus d’informations dans l’aide à l’utilisateur qui lui est dédiée. Une fois la configuration souhaitée effectuée, vous pouvez cliquer sur suivant. Ici, vous arrivez à l’onglet Documents et vous pouvez lui ajouter une photo.
Für das SMS-Management finden Sie weitere Informationen in der Benutzerhilfe, die dafür vorgesehen ist. Sobald die gewünschte Konfiguration vorgenommen wurde, können Sie auf Weiter klicken. Hier gelangen Sie zum Tab Dokumente, und Sie können ihm ein Foto hinzufügen.
For SMS Management, you can find more information in the user help dedicated to it. Once the desired configuration is done, you can click Next. Here, you arrive at the Documents tab, and you can add a photo.
For SMS Management, you can find more information in the user help dedicated to it. Once the desired configuration is done, you can click Next. Here, you arrive at the Documents tab, and you can add a photo.
Per la Gestione SMS, troverai maggiori informazioni nell'aiuto utente a essa dedicato. Una volta completata la configurazione desiderata, puoi cliccare su Avanti. Qui, arrivi nella scheda Documenti e puoi aggiungere una foto.
Para a Gestão de SMS, poderá encontrar mais informações na ajuda ao utilizador dedicada. Uma vez feita a configuração desejada, pode clicar em avançar. Aqui, você chega à guia Documentos e pode adicionar uma foto.
Para la Gestión de SMS, podrá encontrar más información en la ayuda al usuario dedicada. Una vez realizada la configuración deseada, puede hacer clic en siguiente. Aquí, llegará a la pestaña Documentos y podrá añadir una foto.
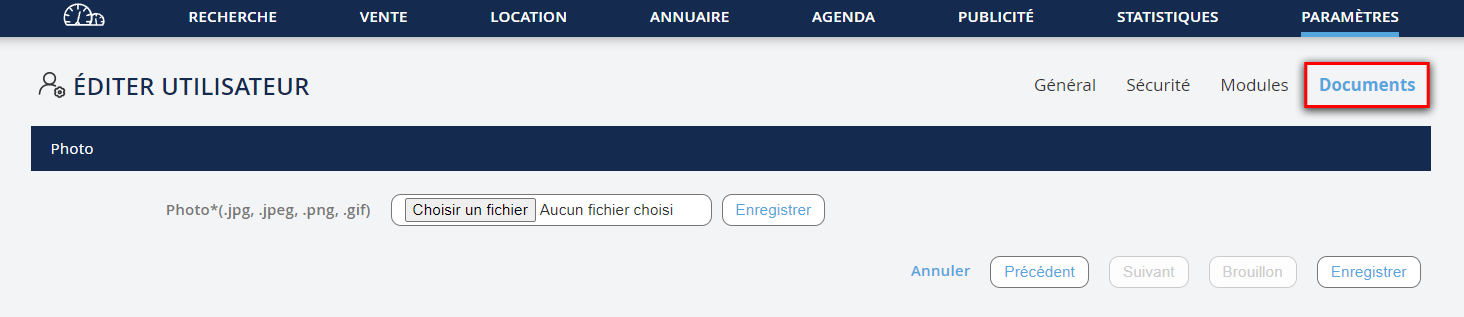
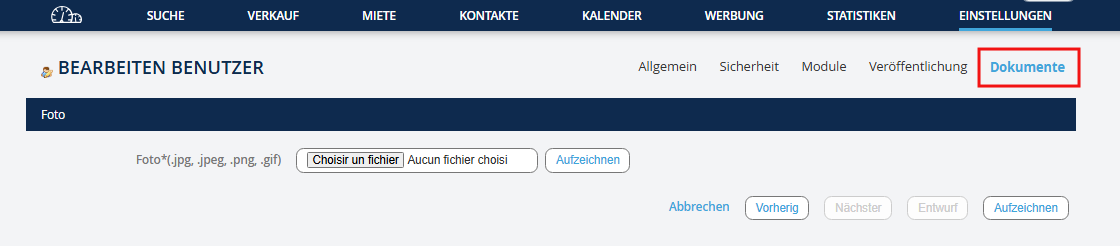
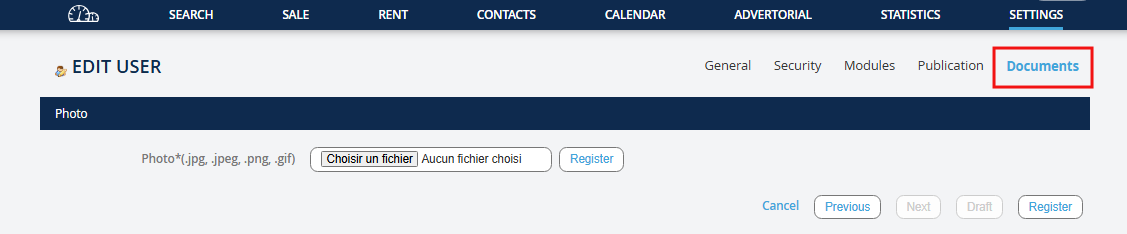
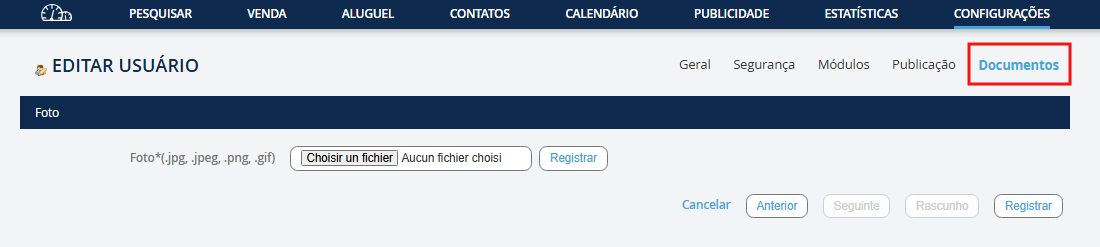
Cliquez sur suivant en bas de la page afin d'atteindre l'onglet Documents c'est ici que vous pouvez télécharger la photographie de l'utilisateur (facultatif)
Klicken Sie auf Weiter am unteren Rand der Seite, um zum Tab Dokumente zu gelangen. Hier können Sie das Benutzerfoto hochladen (optional)
Click on Next at the bottom of the page to reach the Documents tab. This is where you can upload the User's photograph (optional)
Click on Next at the bottom of the page to reach the Documents tab. This is where you can upload the User's photograph (optional)
Clicca su Avanti in fondo alla pagina per raggiungere la scheda Documenti. Qui puoi caricare la fotografia dell'utente (facoltativo)
Clique em Avançar no fundo da página para chegar à guia Documentos. Aqui você pode fazer o upload da fotografia do utilizador (opcional)
Haz clic en Siguiente al final de la página para llegar a la pestaña Documentos. Aquí puedes cargar la fotografía del usuario (opcional)


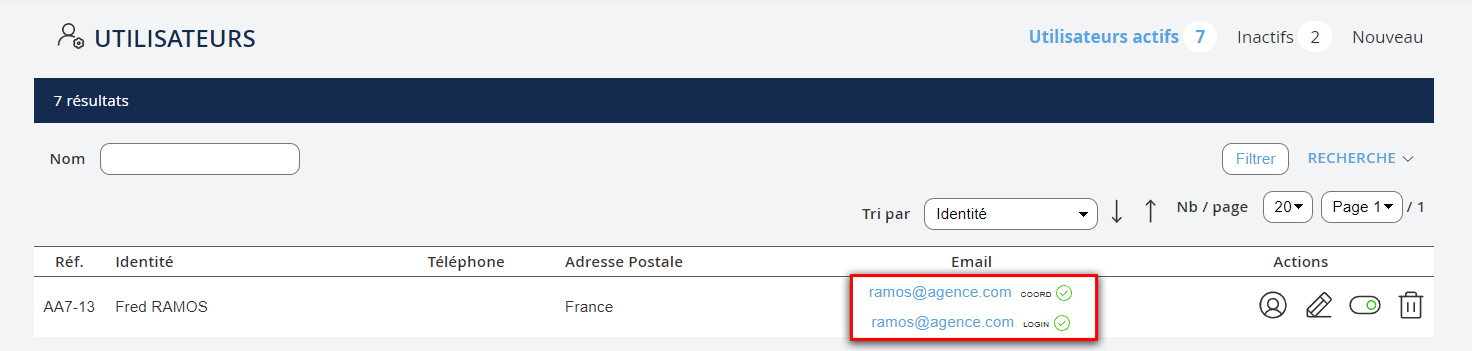
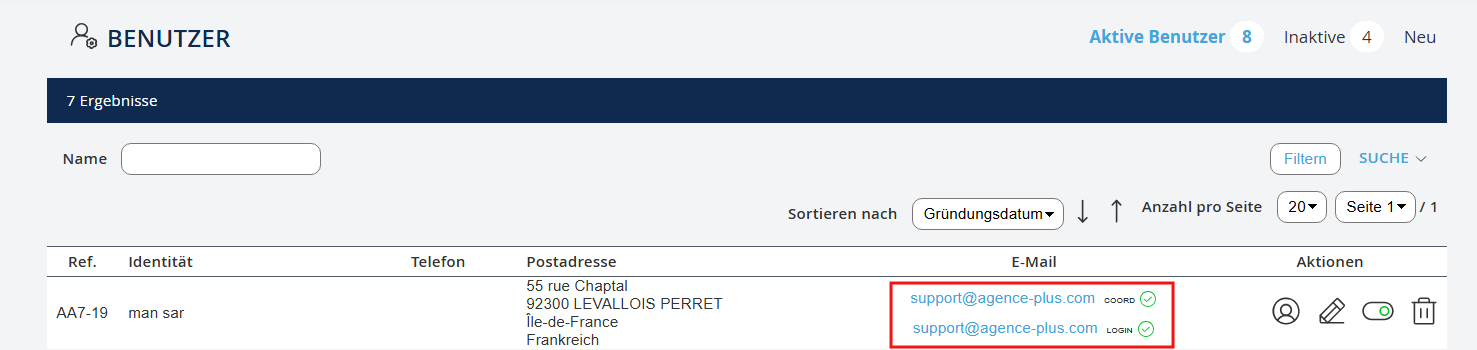
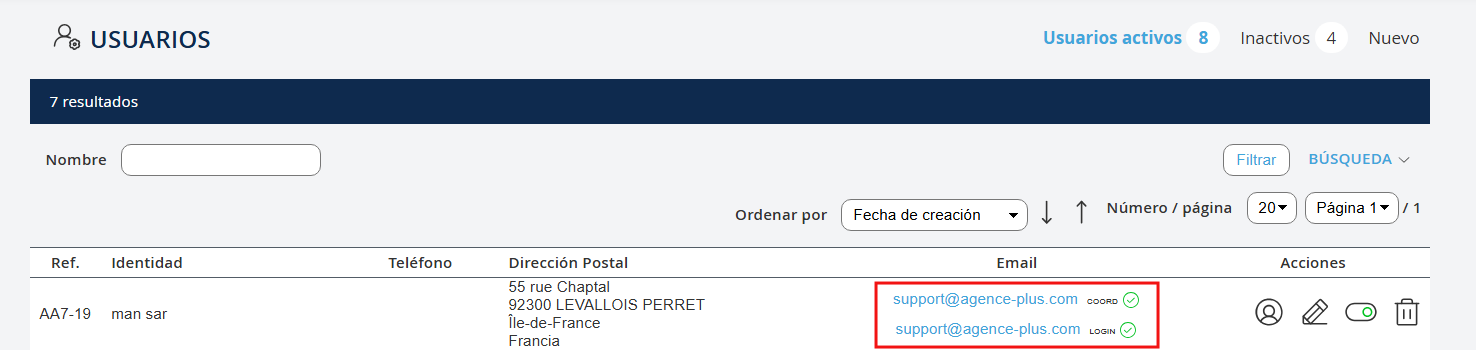
Sélectionnez Enregistrer en bas de pageQuand vous retournez dans l'onglet utilisateurs actifs vous trouverez vos mails validés avec une icône verte : le mail de coordonnées de signature et le mail de login.
Wählen Sie Speichern am unteren Rand der SeiteWenn Sie zum Tab "Aktive Benutzer" zurückkehren, finden Sie Ihre validierten E-Mails mit einem grünen Symbol: die E-Mail der Signaturdaten und die E-Mail des Logins.
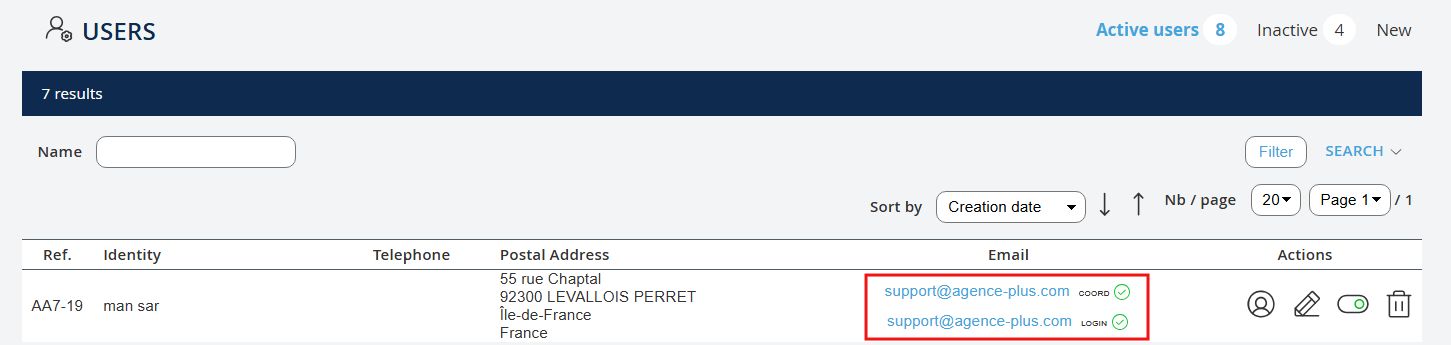
Select Save at the bottom of the pageWhen you return to the active users tab, you will find your validated emails with a green icon: the signature details email and the login email.
Select Save at the bottom of the pageWhen you return to the active users tab, you will find your validated emails with a green icon: the signature details email and the login email.
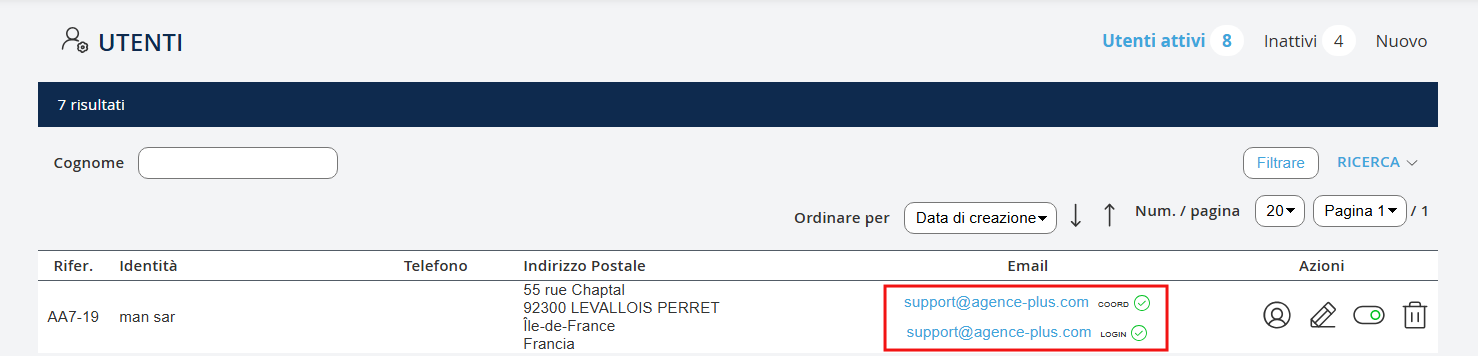
Seleziona Salva in fondo alla paginaQuando torni nella scheda utenti attivi troverai le tue email convalidate con un'icona verde: l'email con i dati di firma e l'email di login.
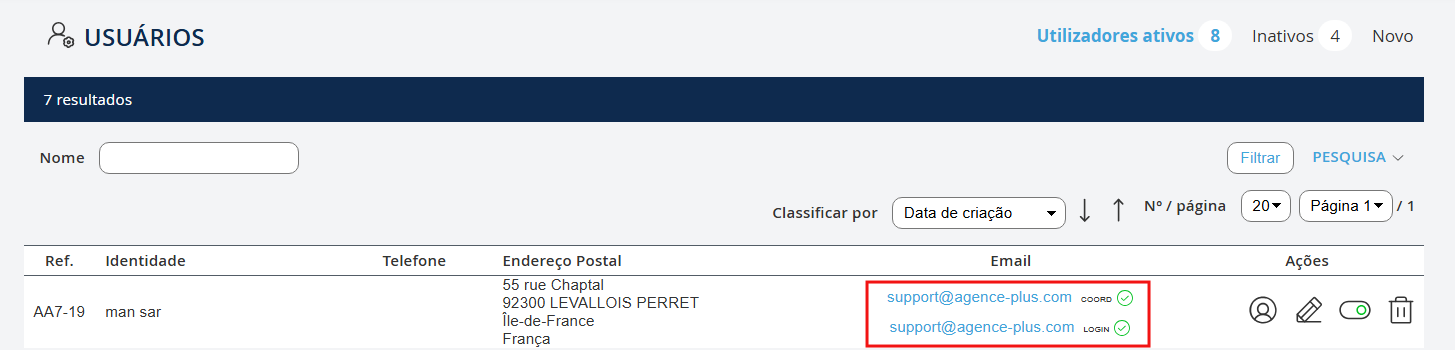
Selecione Guardar no fundo da páginaQuando voltar à guia utilizadores ativos, encontrará os seus e-mails validados com um ícone verde: o e-mail com os dados de assinatura e o e-mail de login.
Seleccione Guardar en la parte inferior de la páginaCuando regrese a la pestaña de usuarios activos, encontrará sus correos electrónicos validados con un icono verde: el correo electrónico de datos de firma y el correo electrónico de inicio de sesión.
Si vous cochez la case : • Administrateur, vous attribuez à l'utilisateur les droits administrateurs c'est à dire que le négociateur aura tous les droits sur le logiciel. Il aura notamment accès à l’onglet Paramètres du logiciel. • Accès Licence Nomade, vous lui donnez accès à une licence nomade, c’est-à-dire que le négociateur pourra se connecter au logiciel à distance (sur n’importe quel ordinateur doté d’une connexion internet)
Wenn Sie das Kästchen ankreuzen : • Administrator, gewähren Sie dem Benutzer Administratorrechte, was bedeutet, dass der Verhandlungsführer alle Rechte in der Software hat. Er hat insbesondere Zugriff auf den Tab Software-Einstellungen. • Nomadische Lizenzzugang, Sie geben ihm Zugriff auf eine nomadische Lizenz, das heißt, der Verhandlungsführer kann sich aus der Ferne in die Software einloggen (auf jedem Computer mit Internetverbindung)
If you check the box: • Administrator, you assign the user administrator rights, meaning the negotiator will have all the rights on the software. They will have access to the Software Settings tab. • Nomadic License Access, you give them access to a nomadic license, meaning the negotiator can connect to the software remotely (on any computer with an internet connection).
If you check the box: • Administrator, you assign the user administrator rights, meaning the negotiator will have all the rights on the software. They will have access to the Software Settings tab. • Nomadic License Access, you give them access to a nomadic license, meaning the negotiator can connect to the software remotely (on any computer with an internet connection).
Se selezioni la casella: • Amministratore, assegni all'utente i diritti da amministratore, il che significa che il negoziatore avrà tutti i diritti sul software. Avrà accesso alla scheda Impostazioni software. • Accesso alla Licenza Nomade, gli consenti l'accesso a una licenza nomade, cioè il negoziatore potrà connettersi al software da remoto (su qualsiasi computer con connessione internet)
Se marcar a caixa: • Administrador, atribui ao utilizador os direitos de administrador, ou seja, o negociador terá todos os direitos no software. Ele terá acesso à guia Definições do Software. • Acesso à Licença Nomada, você dá a ele acesso a uma licença nomada, ou seja, o negociador poderá se conectar ao software remotamente (em qualquer computador com conexão à internet).
Si marca la casilla: • Administrador, asigna al usuario derechos de administrador, lo que significa que el negociador tendrá todos los derechos sobre el software. Tendrá acceso a la pestaña Configuraciones del Software. • Acceso a Licencia Nómada, le da acceso a una licencia nómada, es decir, el negociador podrá conectarse al software de forma remota (en cualquier ordenador con conexión a internet).
NB : Pour se connecter au logiciel, le négociateur devra renseigner l’adresse suivante dans son navigateur : agence-plus.net puis compléter les éléments suivants : Code Agence+ Identifiant (adresse mail ou n°de portable si renseigné) + Mot de passe (que le négociateur a créé) LICENCE PERMANENTE Pour se connecter sur une licence permanente, il est nécessaire de valider également les adresses emails de signature et d'identification. Licence Nomade ne doit pas être cocher à l'onglet Sécurité RÉINITIALISATION DU MOT DE PASSE Si le négociateur a besoin de réinitialiser son mot de passe, il devra sélectionner Mot de passe oublié sur l'écran de connexion à Agence Plus. Un email lui sera alors adressé. L'utilisateur n'a plus qu'à suivre la procédure de réinitialisation décrite dans le mail.
Hinweis: Um sich in die Software einzuloggen, muss der Verhandlungsführer die folgende Adresse in seinem Browser eingeben: agence-plus.net und dann die folgenden Angaben vervollständigen: Code Agence+ Benutzerkennung (E-Mail-Adresse oder Handynummer, falls angegeben) + Passwort (das der Verhandlungsführer erstellt hat) PERMANENTE LIZENZ Um sich mit einer permanenten Lizenz anzumelden, müssen auch die E-Mail-Adressen für die Signatur und die Identifikation validiert werden. Nomadische Lizenz darf im Tab Sicherheit nicht aktiviert sein. PASSWORT-WIEDERHERSTELLUNG Falls der Verhandlungsführer sein Passwort zurücksetzen muss, muss er auf dem Anmeldebildschirm von Agence Plus auf Passwort vergessen klicken. Eine E-Mail wird ihm dann zugeschickt. Der Benutzer muss nur noch der Wiederherstellungsprozedur folgen, die in der E-Mail beschrieben ist.
Note: To log in to the software, the negotiator must enter the following address in their browser: agence-plus.net and then complete the following details: Agence+ Code, Identifier (email address or mobile number if provided) + Password (created by the negotiator) PERMANENT LICENSE To log in with a permanent license, it is also necessary to validate the signature and identification email addresses. Nomadic License must not be checked in the Security tab. RESETTING THE PASSWORD If the negotiator needs to reset their password, they must select Forgot password on the Agence Plus login screen. An email will then be sent to them. The user simply needs to follow the reset procedure described in the email.
Note: To log in to the software, the negotiator must enter the following address in their browser: agence-plus.net and then complete the following details: Agence+ Code, Identifier (email address or mobile number if provided) + Password (created by the negotiator) PERMANENT LICENSE To log in with a permanent license, it is also necessary to validate the signature and identification email addresses. Nomadic License must not be checked in the Security tab. RESETTING THE PASSWORD If the negotiator needs to reset their password, they must select Forgot password on the Agence Plus login screen. An email will then be sent to them. The user simply needs to follow the reset procedure described in the email.
Nota: Per accedere al software, il negoziatore dovrà inserire il seguente indirizzo nel suo browser: agence-plus.net e poi completare i seguenti dettagli: Codice Agence+ Identificativo (indirizzo e-mail o numero di cellulare, se fornito) + Password (creata dal negoziatore) LICENZA PERMANENTE Per accedere con una licenza permanente, è necessario anche convalidare gli indirizzi e-mail di firma e identificazione. Licenza Nomade non deve essere selezionata nella scheda Sicurezza. RESETTARE LA PASSWORD Se il negoziatore ha bisogno di reimpostare la password, dovrà selezionare Password dimenticata nella schermata di login di Agence Plus. Gli verrà inviata un'email. L'utente dovrà quindi seguire la procedura di reimpostazione descritta nell'email.
Nota: Para se conectar ao software, o negociador deverá inserir o seguinte endereço no seu navegador: agence-plus.net e, em seguida, completar os seguintes dados: Código Agence+ Identificador (endereço de e-mail ou número de telemóvel, se fornecido) + Palavra-passe (que o negociador criou) LICENÇA PERMANENTE Para se conectar com uma licença permanente, é necessário validar também os endereços de e-mail de assinatura e identificação. Licença Nomada não deve ser marcada na guia Segurança. RESTAURAÇÃO DA PALAVRA-PASSE Se o negociador precisar de redefinir a palavra-passe, deverá selecionar Esqueceu a palavra-passe na tela de login do Agence Plus. Um e-mail será enviado para ele. O usuário só precisa seguir o procedimento de redefinição descrito no e-mail.
Nota: Para acceder al software, el negociador debe ingresar la siguiente dirección en su navegador: agence-plus.net y luego completar los siguientes detalles: Código Agence+ Identificador (dirección de correo electrónico o número de móvil, si se proporciona) + Contraseña (creada por el negociador) LICENCIA PERMANENTE Para acceder con una licencia permanente, también es necesario validar las direcciones de correo electrónico de firma e identificación. Licencia Nómada no debe estar marcada en la pestaña Seguridad. REINICIO DE LA CONTRASEÑA Si el negociador necesita restablecer su contraseña, deberá seleccionar Contraseña olvidada en la pantalla de inicio de sesión de Agence Plus. Se le enviará un correo electrónico. El usuario solo tiene que seguir el procedimiento de restablecimiento descrito en el correo electrónico.